


Removal and Replacement of Parts (with Calibration) 10-1
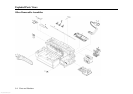
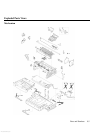
Chapter 10 Removal and Replacement of Parts
(with Calibration)
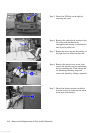
This chapter describes how the printer can be disassembled for repair and maintenance.. This section
covers the removal of parts that require calibration upon assembly. To reassemble the printer, reverse the
order of the procedure. Where required, additional explanation will also be provided for any special
adjustments or procedure steps (such as instances where reassembly differs from disassembly).
You should also take note that it may not be necessary to disassemble the printer to service certain
components.
Removal and Replacement Tools
To disassemble the printer, you will need the following tools :
1. A TORX
screwdriver with T-10 and T-20 screw bits.
2. Needle nose pliers.
3. Straight tweezers.
4. A flat-blade screw driver (Philips no.1 or flathead no.5).
5. Instruction manual.
It is strongly recommended that proper tools (including screws) be used for the job.
Before You Begin
Check the following before you begin disassembly :
1. The printer is turned off and the power cable has been disconnected from the socket.
2. Paper has been removed from the tray.
3. Ink cartridges and pens are removed from the printer.
Caution
Your body may discharge static current which may damage the fragile PCAs. Before disassembly
please ensure that the proper precautions to prevent damage by electrostatic discharge (ESD) to
ESD-sensitive printer components have been taken with ESD heel or wrist straps. Ensure also that
the work area is similarly free of static current.
When disassembling the printer, ensure that the capacitors are fully discharged before you handle
power supply components. As a precaution, switch off the printer before disconnecting it from the
power socket, and wait five seconds before commencing disassembly.
www.GovTechMedia.com