


Calibration 11-3
Pen-to-Paper Calibration (PPC)
Measurement
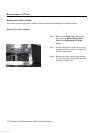
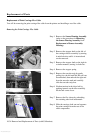
Step 1. Put the Zaphod sensor pen in the carriage of HP DesignJet ColorPro Series
Printer. Use the slot for the black pen.
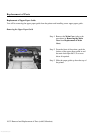
Step 2. Pick the paper using Paper Jam Removal Knob and drive it until 20 mm ahead of
Cockle Rib ends.
Note
1. Use special PPC media supplied. Do not use any other paper.
2. Media should be inserted in Landscape mode.
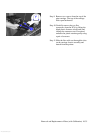
Step 3. Move the carriage to the left side of the paper. Give around 10 mm margin from
the end of paper to the sensor.
Step 4. Check the reading. Adjust the carriage to make the paper angle between LSL
and USL, that is, the red floating line is between two blue lines.
Step 5. Tighten the carriage adjustor.
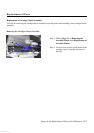
Step 6. Move the carriage to the right position of the paper.
Step 7. Adjust the carriage.
Step 8. Tighten the carriage adjustor.
Step 9. Scan move the carriage across the media to check whether any region is out of
specification. If an area is out of specification, adjust the carriage to rectify the
error.
Step 10. Torque tighten the adjustor screws to 10Kgfcm ± 0.5Kgfcm. If this adjustment
cannot ensure the product to be within specification, change the Upper Paper
Guide until the specification is met.
This document and all future updates are available in the web site,
http://gul61198.sgp.hp.com/ppcinstall.htm. This is part of the Intranet and will be
available only inside HP.
www.GovTechMedia.com