


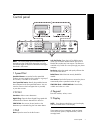


Managing and configuring fax settings 15
English
Managing and configuring
fax settings
If you are connecting the device directly to a computer,
install the device software, and then run the Fax Setup
Wizard (Windows) or HP Device Manager (Mac OS).
You can also launch these tools from Solution Center
(Windows) or HP Device Manager (Mac OS) at a later
time. Use these tools to set the fax header, country/
region, and date and time.
In addition, you can configure the fax settings from the
embedded Web server (EWS). For information on the
EWS, see page 28.
You can also configure these settings from the control
panel. For information on the control panel, see the
onscreen user guide on the Starter CD.
Set up speed-dial entries
You can store fax numbers or groups of fax numbers as
speed-dial entries. Speed-dial entries 1 through 5 are
associated with the corresponding five speed-dial
buttons on the control panel. This lets you dial those
numbers quickly by using the control panel.
In addition to using the control panel, you can also set
up speed-dial entries using the embedded Web server
and the HP Photosmart software. For information,
see the onscreen user guide on the Starter CD.
To set up speed-dial entries
1. From the control panel, press Setup.
2. Select Speed Dial Setup and do one of the following:
• To add or change an entry: Select Individual
Speed Dial or Group Speed Dial and press the
arrow keys to move to an unused entry number,
or type a number on the keypad. Type the fax
number, and then press OK. Include any pauses
or other required numbers, such as an area
code, an access code for numbers outside a PBX
system (usually a 9 or 0), or a long-distance
prefix. Type the name using the numeric keypad,
and then press OK.
• To delete one entry or all entries: Select Delete
Speed Dial and press the arrow keys to move to
the speed-dial entry that you want to delete, and
then press OK.
Test fax setup
You can test your fax setup to check the status of the
device and to make sure it is set up properly for faxing.
Perform this test after you have completed setting up the
device for faxing. The test does the following:
• Tests the fax hardware
• Verifies the correct type of phone cord is connected
to the device
• Checks that the phone cord is plugged into the
correct port
• Checks for a dial tone
• Checks for an active phone line
• Tests the status of your phone line connection
The device prints a report with the results of the test.
If the test fails, review the report for information on how
to fix the problem and rerun the test. For additional
troubleshooting information, see “Solving fax problems
(optional)” on page 26.
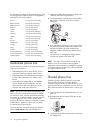
To test fax setup
1. Set up the device for faxing according to your
particular home or office setup instructions.
2. Make sure the ink cartridges and printheads are
installed, and that full-size paper is loaded in the
input tray before starting the test.
3. From the control panel, press Setup.
4. Select Tools, and then select Run Fax Test.
The device displays the status of the test on the
display and prints a report.
5. Review the report.
• If the test passes and you are still having
problems faxing, check the fax settings listed in
the report to verify the settings are correct.
A blank or incorrect fax setting can cause
problems faxing.
• If the test fails, review the report for more
information on how to fix any problems found.