


Set up the device 3
English
7.
When prompted, load paper, and then press
the OK button.
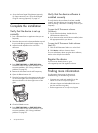
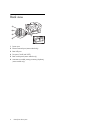
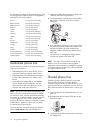
a. Lift the output tray.
b. Insert up to 250 sheets of paper into Tray 1,
print-side down, along the right hand side of
the tray. Make sure the stack of paper aligns
with the right and back edges of the tray
and does not exceed the line marking in the
tray.
NOTE: Tray 2 can be loaded only with plain
paper.
c. Slide the media guides in the tray to the size
that you are loading.
d. Lower the output tray and pull out the
extension.
To ensure the best possible print quality, the
device initializes and aligns the printheads. This
process takes approximately 12 minutes.
8.
Install software and connect the device.
You can connect the device using one of the
following types of connections:
• USB
• Ethernet network (some models only).
• Wireless (802.11) network (some models
only).
• Fax (some models only).
For more information about device software and
connectivity, see the onscreen user guide on the
Starter CD.
a. Insert the Starter CD, click Install (Windows)
or Install Software (Mac OS), and then
follow the onscreen instructions to complete
the software installation.
NOTE: If the CD menu does not start
automatically, double-click the setup icon on the
Starter CD.
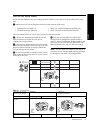
b. Connect the USB cable to the computer,
when prompted.
USB
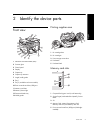
a. Remove the protective cover from the
device’s network connector.
b. Connect the network cable to the connector
and to an available port on the network hub,
switch, or router. If the connector’s Link light
does not turn on, try a different port.
CAUTION: Do not plug the network cable into
a port labeled WAN, Uplink, or Internet in the
hub, switch, or router.
c. Insert the Starter CD, click Install (Windows)
or Install Software (Mac OS), and then
follow the onscreen instructions to complete
the software installation.
If the installation program displays more
than one instance of the device, print a
Network configuration page to select the
right device.
NOTE: If the CD menu does not start
automatically, double-click the setup icon on the
Starter CD.
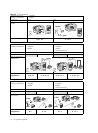
d. Print the Network configuration page. This
page contains information needed for setup.
On the control panel, press the Setup button,
and then complete one of the following:
• If your device has a two-line display, select
Network Setup, select Print Network Settings,
and then press OK.
• If your device has a color display, select
Network, select View Network Settings,
select Print Network Configuration Page, and
then press OK.
For information about wireless communication
and setup instructions, see “Set up the device for
wireless communication (optional)” on page 19.
If you install software using the installation
program on the Starter CD, you can configure
fax settings after the device software is installed
using the Fax Setup Wizard (Windows) or HP
Device Manager (Mac OS). For more
information about setting up the fax, see “Set up
the fax (optional)” on page 9.
Ethernet network
Wireless 802.11 network
Fax