Advanced Menu (PICTURE menu)
Item Description
Continuation of
"GAMMA"
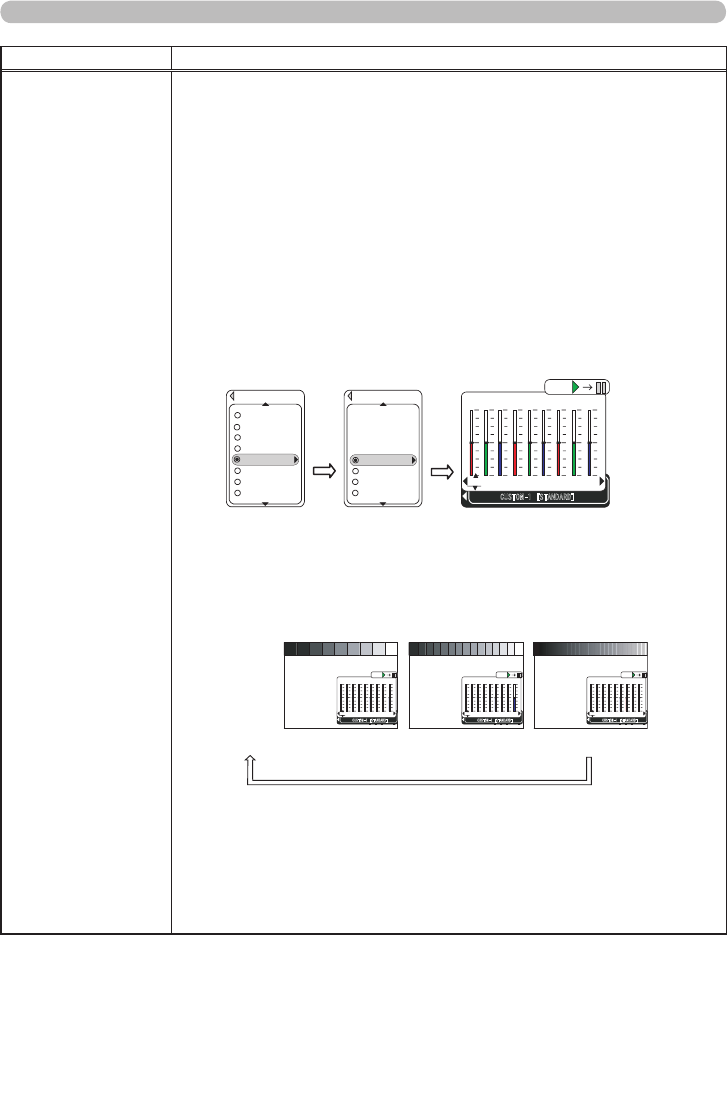
To adjust a CUSTOM mode
(1) Select one of the CUSTOM modes to adjust using the ▲/▼
cursor buttons. Then press the ► cursor button to display the
CUSTOM dialog.
(2) Select the base mode to be adjusted using the ▲/▼ cursor
buttons.
Note that changing the base mode and pressing the ► cursor
button in the CUSTOM dialog will erase the current settings
of the selected mode. If you want to keep the settings, please
press the ◄ cursor button to return to the preceding menu, and
select a different CUSTOM mode.
Then press the ► cursor button to display a dialog with 9
adjustment bars. Each bar corresponds to the tone of each of 9
gamma steps. The names of selected mode and the base mode
are shown at the bottom of the dialog.
(3) Pressing the ENTER button while the dialog is displayed displays
a test pattern to aid in adjusting.
This projector has 3 types of test pattern. Each time you press
the ENTER button, the test pattern is changed.
Each part of the 9 step gray scale is linked to the corresponding
adjustment bar in the dialog.
(no display)
9 step
15 step
Ramp
gray scale gray scale
(4) Select the adjustment bar for the step to adjust using the ◄/►
cursor buttons.
Note that pressing the cursor ◄ button while the number 1
adjustment bar is selected closes the dialog and returns to the
GAMMA menu.
(5) Adjust the tone of the selected step using the ▲/▼ cursor
buttons.
(Continued on next page)
LOW
HIGH
Hi‑CONTRAST
GAMMA
CUSTOM‑2
CUSTOM‑3
CUSTOM‑4
CUSTOM‑1
STANDARD
► ►
MIDDLE
CUSTO
M
LOW
+0
+0 +0 +0 +0 +0 +0
CUSTOM‑1 [STANDARD]
ENTER:
+0
+0
1 2 3 4 5 6 7 8
9
the reference
CUSTOM‑1
Select
LOW
HIGH
Hi‑CONTRAST
STANDARD
MIDDLE
CUSTOM
LOW
+0
+0+0 +0 +0+0 +0
CUSTOM‑1 [STANDARD]
ENTER:
+0
+0
1 2 3 4 5 6 7 8 9
MIDDLE
CUSTOM
LOW
+0
+0+0 +0 +0+0 +0
CUSTOM‑1 [STANDARD]
ENTER:
+0
+0
1 2 3 4 5 6 7 8
9
MIDDLE
CUSTOM
LOW
+0
+0+0 +0 +0+0 +0
CUSTOM‑1 [STANDARD]
ENTER:
+0
+0
1 2 3 4 5 6 7 8
9
