


14 - 9
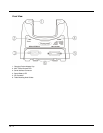
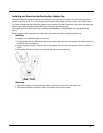
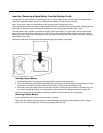
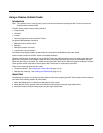
Connecting Input/Output Cables to the Desktop Cradle
Note: Route all cables to ensure they are protected from jostling, tugging or being disconnected by passing objects.
The cradle must be receiving power from an external power source before MX7 Tecton battery charging can begin.
The serial cable is connected to the port labeled Serial Interface on the left front of the desktop cradle. The serial cable end
can originate with a tethered scanner, a PC, a printer or another serial device.
The I/O connector cable is connected to the port (male) labeled MX7 Tecton I/O Port on the right front of the desktop cradle.
Periodically test the connections for stability and re-tighten if necessary.
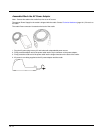
Attaching a Serial Cable
1. Align the RS232 serial cable end (female) carefully to the Serial Interface port (male) on the left front of the desktop
cradle.
2. Press the ends together and finger tighten the screws on either side of the connector.
3. Test the connection for stability.
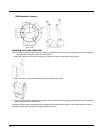
Attaching the Input/Output (I/O) Cable
1. Squeeze the clips next to the connector attached to the cable to open the catches in the connector assembly.
2. Firmly press the cable end (female) into the MX7 Tecton I/O Port connector (male) on the front of the cradle.
3. Release the clips in the connector cable.
4. Test the connection for stability.
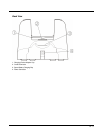
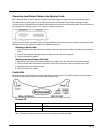
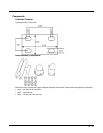
Cradle LEDs
When the desktop cradle AC/DC power supply cable begins to supply power to the cradle, the cradle LEDs flash yellow,
red, green for three seconds then turn off. The cradle is ready for use.
Docked LED
Note: The cradle must be connected to a power source before the LEDs illuminate.
When Docked LED is … It means ….
Off MX7 Tecton not inserted or no power applied.
Red MX7 Tecton docked and power applied.