


2 - 18
Attaching the Trigger Handle
Either the trigger handle or the handstrap is attached, not both. Honeywell recommends that, in the absence of a trigger handle,
the handstrap be used at all times.
Pressing the trigger on the trigger handle activates the integrated scanner and functions the same as the Scan button on the
keypad. With the trigger handle installed the Scan key on the keypad remains active. A trigger press duplicates the Scan button
press operation.
Tool required: Torque wrench capable of torquing to 3±1 in/lb (.34±.11 N/m).
1. Place the MX7 in Suspend.
2. Place the MX7 Tecton with the screen facing down, on a flat stable surface.
3. Remove the handstrap, if installed. Tool required: Phillips #1 screwdriver.
4. Remove the main battery.
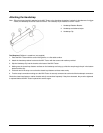
5. Slide the locking tab on the underside of the trigger handle into the slot at the back of the battery compartment and press it
firmly into place.
6. Ensure that the main battery can be inserted into the battery compartment before securing the trigger handle in place.
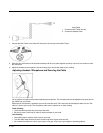
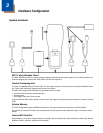
7. Attach the trigger handle to the MX7 Tecton (as shown above) with the screws provided.
8. Torque the pan head screws to 3±1 in/lb (.34±.11 N/m).
9. Secure the strap tether to the trigger handle.
10. Place the stylus in the stylus holder in the bottom of the trigger handle. Tie the stylus tether to the stylus and the trigger
handle.
Periodically check the trigger handle for wear and the connection for tightness. If the handle gets worn or damaged, it must be
replaced. If the trigger handle connection loosens, it must be tightened or replaced before the MX7 Tecton is placed back in ser-
vice.
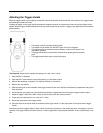
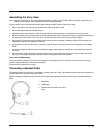
• The handle is built of a durable, flexible plastic.
• The handle will not detach from the MX7 Tecton if the unit is dropped.
• The trigger handle is a mechanical device. Battery or external A/C power is not
required for operation.
• The trigger handle does not need to be removed when replacing the main battery
pack.
• The trigger handle might also be called a pistol grip.