


Connecting Telecommunications Cables
Attention
Do not connect or handle the cable during a lightning storm.
The following instructions assume that you have the adapter in the system unit and
are ready to attach an Telecommunications Cables.
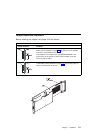
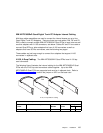
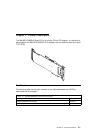
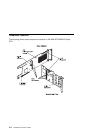
1. Align the 36-pin connector of the cable with the 36-pin connector at the rear of
the IBM ARTIC960RxD Quad DTA.
2. Depress the latch buttons on either side of the cable connector and firmly press
the cable connector into the 36-pin connector.
3. Release the latch buttons and make sure that the cable connector latches are
securely seated.
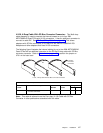
If required, connect a lightning protection device to the other ends of the cable.
Refer to the instructions that came with the device.
At the very least, the grounding strap on the lightning protection device should be
connected to an earth-ground on or near the computer.
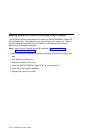
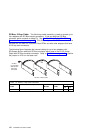
4. Connect one or more of the four ports of the optional cable to the target device.
Each connector is marked with its port number.
Telecommunications ports are numbered 0,1,2 and 3 whereas some software (such
as DirectTalk/AIX) refers to the ports as 'Trunks 1,2,3 and 4'.
Note: Moving the system unit with a cable attached can dislodge an adapter. If any
adapter or card becomes dislodged while power is applied, proceed as
follows:
1. Turn off the computer and unplug all power cords.
2. Remove the system unit cover.
3. Loosen the expansion-slot screw of the dislodged adapter. Press down
on the top edge of the adapter to reseat it. Then, re-tighten the
expansion-slot screw.
4. Reinstall the system unit cover and replug power cords.
5. Turn on the computer.
1-8 Installation and User's Guide