


C H A P T E R 2 Intel Express 100BASE-TX Stackable Hub
20
d. Tighten the screw locks on the cable connectors to secure the
plug to the hub.
e. Repeat steps a through d for all the hubs in the stack.
3. Connect the power cords to the AC power receptacles on the rear
panel of all the hubs in the stack.
Connect the power cord to the AC power receptacles on the hub
and then to the power outlet.
Removing an Express hub
This section provides instructions for removing an Express hub from a
stack. When removing an Express hub from a stack, follow this
sequence:
1. Disconnect power cords from the AC power receptacle on the hub
rear panel.
All power sources should be disconnected. To verify that power
sources are disconnected, check that the Pwr LED on the hub front
panel is off.
2. Disconnect the cascade cables from the Cascade Down and
Cascade Up connectors on the hub rear panel.
Save the cascade cable that was removed with the inoperable hub
for later use.
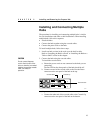
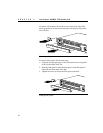
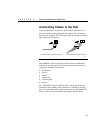
3. Connect the free end of the cable connected to the Cascade Down
connector on the hub above the inoperable hub to the Cascade Up
connector on the hub below the inoperable hub.
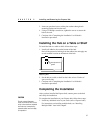
Cascade down Cascade up
Cascade cable
5912
Installing a cascade cable
CAUTION
Check that the screw locks on
the cable connectors are fully
tightened and the cable
connection is secure. A faulty
cable connection could
disrupt the operation of the
entire stack.
NOTE
You may need an assistant to
remove a hub from a stack
that is located on a table or a
shelf.
CAUTION
Removing a hub removes
port connectivity for that hub
from the network. When you
remove a hub from the
middle of the stack (a hub
that is in the middle of the
stack is any hub that is
located between two
operating hubs), you split the
Ethernet segment into two
separate segments.