


C H A P T E R 2 Installing and Removing the Express Hub
21
For hubs that are mounted on a rack, you may have to remove the
inoperable hub from the stack and move the adjacent hub up one
rack mounting space, or install a replacement hub in the rack,
before connecting the cascade cable to the new hub.
For hubs that are mounted on a table or shelf, remove the
inoperable hub before connecting the cascade cable to the new
hub.
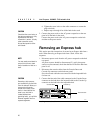
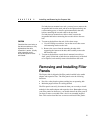
4. To remove the hub from the rack, follow these steps:
a. Use a #2 Phillips screwdriver, loosen the screws that secure
each mounting bracket to the rack.
b. Remove the screws from the mounting bracket while
supporting the bottom of the hub, then carefully remove the
hub from the rack.
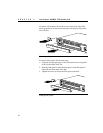
5. To remove the hub from a stack that is mounted on a table or
shelf, gently lift the hub or hubs that are stacked on top of the hub
to be replaced, and carefully remove that hub from the stack.
Removing and Installing Filler
Panels
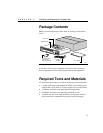
The Express hub is shipped with filler panels installed in the media
adapter and expansion slots. The filler panels serve the following
functions:
• Provide a safety barrier against reaching into an operating hub
• Maintain proper airflow for cooling the hub
The filler panels can easily be removed when you are ready to install
modules in the media adapter and expansion slots. Remember to keep
your filler panels for future use; you should reinstall the filler panel if
you have to remove a module from a slot for an extended length of
time. This section describes how to remove and install filler panels.
CAUTION
Check that the screw locks on
the cable connectors are fully
tightened and the cable
connection is secure. A faulty
cable connection could
disrupt the operation of the
entire stack.