


CHAPTER 3
Installing ERX Modules
3-6
Safety Guidelines
Before and during the installation process, observe the following
precautions:
Lightning Activity Warning: Do not work on the system or connect or disconnect
cables during lightning activity.
DC Power Disconnection Warning: Before powering on the ERX system,
remove power from the DC circuit by deactivating the circuit breaker on the panel
board that services the DC circuit.
Jewelry Removal Warning: Remove jewelry (including rings, necklaces, and
watches) before working on equipment that is connected to power lines. Metal
objects heat up when connected to power and ground and can cause serious
burns or become welded to the terminals.
Metal Objects Warning: Do not insert any metal object, such as a screwdriver,
into an open slot or the backplane. Doing so may cause electric shock and serious
burns.
Repair Warning: Never attempt to repair parts of modules yourself. Only trained
customer service personnel are authorized to service parts. Call Juniper Networks
Customer Service to make arrangements to return defective modules for repair.
See Appendix F, Customer Service.
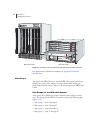
Installing SRP I/O and SRP Modules
You should install SRP modules only in chassis slots 6 and 7 of the
ERX-1400 series and slots 0 and 1 of the ERX-700 series.
Note: Install the SRP I/O module before you install the SRP module; otherwise, the
ERX system diagnostics fail.
Installing an SRP I/O Module
To install an SRP I/O module:
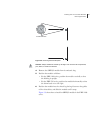
1 Connect the antistatic wrist strap to the ESD grounding jack on your
ERX system.
Caution: When handling modules, use an antistatic wrist strap connected to the
ERX system’s ESD grounding jack. This action helps to protect the module from
damage by electrostatic discharge.
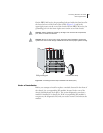
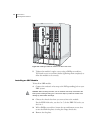
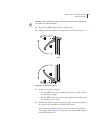
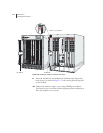
2 With a Phillips screwdriver, loosen the top and bottom captive screws
securing the blank faceplate covering the empty slot. See Figure 3-5.
3 Remove the faceplate.