


Introduction 1-6
Reference Guide
2. Original Image Clarity and Color
The quality of the original photograph, transparency, or digital file plays a key role in final
print quality as this is where the clarity and color of the image is created. If the original
photographer took a picture that was not in focus, or was fuzzy for any reason, sharpening
or after-effects cannot correct it and a poor inkjet print will result. Differences in film,
speed, grain, or developing process can also affect quality of prints. If the image was too
dark or too light, color correction cannot correct it and a poor inkjet print will result. The
axiom of “garbage in, garbage out” applies to all printing, including inkjet printing. Compa-
nies that utilize a lot of photography for large-format inkjet printing should check for focus
by using a loupe. If you have a good, in-focus original, you can maintain the image quality
throughout the entire process.
3. Scanner Type
How you get the original image into the computer is important to the overall printing
process as scanner quality varies greatly. Using a scanner that meets the requirement of
the overall print quality is essential to have enough color fidelity and edge clarity. An
image scanned with a low end scanner will lose detail, clarity, and color. It is important
that you understand what type of image quality is required for your print and use the right
scanner to achieve it.
Traditionally, drum scanners are ideal for retaining the best edge definition and color
depth. If the original image is poor, an expensive drum scan may be a waste of money.
Almost all service bureaus use drum scanners.
Flatbed scanners require an optional transparency adapter to scan transparencies.
4. Scan Resolution
Scanning the original at low resolution will degrade the large-format inkjet print quality.
Scanning at a resolution which is too high slows down the RIP and adds no quality to the
image. Consequently, choosing the right resolution for the output print size (and thus, the
amount of scaling needed after scanning) will determine what the optimum resolution
should be for each image.
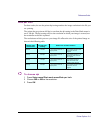
The quality of the image you would like to produce is determined by the final output size
and the file size. For example, if you want output a 36" x 36" image, the file size will be
approximately 24MB for a fair-to-good quality image (75dpi), 43MB for a good-very
good quality (100 dpi) and 97MB for an excellent quality (150 dpi) print.
Your service bureau can help you determine the optimum resolution to scan your image
based on the size and quality of the image you would like to print.