


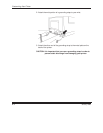


About SCSI-connected Installations
C–2
January 1998
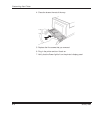
6. Set the SCSI device number using the printer’s display panel.
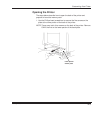
Changing the SCSI ID settings
a. Press Setup/Select when READY-RASTER appears in the dis-
play panel.
b. Use the Print and Cancel buttons to scroll through the list until
PORTS appears.
c. Press Setup/Select to access the PORTS options.
d. Press Print to scroll down (or Cancel to scroll up) through the list
until SCSI appears.
e. Press Setup/Select until TARGET appears.
f. Press Setup/Select to access the TARGET ID.
g. Use the Print and Cancel buttons to scroll through the list.
h. Press Setup/Select to make your selection.
NOTE: An asterisk appears next to the number.
i. Press Cancel until EXIT appears.
j. Press Setup/Select until TARGET appears.
k. Press Cancel until EXIT appears
l. Press Setup/Select until SCSI appears.
m. Press Cancel until EXIT appears.
n. Press Setup/Select until PORTS appears.
o. Press Cancel until EXIT appears.
p. Press Setup/Select to return to Ready - Raster Mode.
q. Reboot host computer.
NOTE: The just-selected option is effective when you power the
printer off and then on.
7. Run the Adaptec EZ-SCSI Software install program to install the soft-
ware on your system.
Instructions for installation are included in the
Adaptec EZ–SCSI for
DOS/Windows, User’s Manual.
Make sure that you select the option
Install ASPI For Windows
and
follow the instructions on the screen for that installation option.