


Notes:
• View the printer IP address on the printer home screen. The IP address appears as four sets of numbers
separated by periods, such as 123.123.123.123.
• If you are using a proxy server, then temporarily disable it to load the Web page correctly.
2 Click Settings.
3 From the Other Settings column, click Manage Shortcuts > E-mail Shortcut Setup.
4 Type a unique name for the e‑mail recipient, and then type the e‑mail address. If you are entering multiple addresses,
then separate each address with a comma.
5 Click Add.
Creating an e-mail shortcut using the printer control panel
1 From the home screen, navigate to:
E-mail > Recipient(s) > type the recipient’s e‑mail address >
Note: To create a group of recipients, touch , and then type the next recipient’s e-mail address.
2 Touch Subject > type the e‑mail subject > .
3 Touch Message > type your message > .
4 Adjust the e‑mail settings.
Note: If you change the settings after the e‑mail shortcut has been created, then the settings are not saved.
5 Touch Save As Shortcut.
6 Type a unique name for the shortcut, and then touch .
7 Verify that the shortcut name is correct, and then touch OK.
If the shortcut name is incorrect, then touch Cancel, and then reenter the information.
Notes:
• The shortcut name appears in the E-mail Shortcuts icon on the printer home screen.
• You can use the shortcut when e‑mailing another document using the same settings.
E-mailing a document
Sending an e-mail using the printer control panel
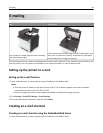
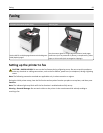
1 Load an original document faceup, short edge first into the ADF tray or facedown on the scanner glass.
Notes:
• Do not load postcards, photos, small items, transparencies, photo paper, or thin media (such as magazine
clippings) into the ADF tray. Place these items on the scanner glass.
E-mailing 86