General problems
76
Troubleshooting
General problems
Problem Solution / Answer
Lights begin blinking. See Understanding the Lexmark E120 operator panel lights on page 10.
Characters missing when
printing to envelopes
Check printer driver settings to make sure Envelope has been selected from the Paper Type
menu.
If Envelope is selected, try selecting a rougher texture setting. Sometimes toner does not
adhere well to smooth-textured envelopes. From the printer driver, select Custom 6-
Rough Env from Paper Type menu.
To change Custom 6 back to its default settings for Paper Type, Paper Texture, and Paper
Weight, use Local Printer Setup Utility on the Software and Documentation CD. If you have
installed printer drivers and utilities, skip to step 7.
1 Insert the Software and Documentation CD into the computer.
2 Click Printer Software.
3 Click Agree.
4 Select Local Printer Install, then click Next.
5 Select the printer and port, and check Local Printer Setup Utility.
6 Click Finish.
The Utility will be installed on the computer under Program Files (unless a different
directory is chosen).
7 Open Local Printer Setup Utility.
8 From the Paper Menu, scroll through the menu items for the Custom menu setting.
9 Click Custom.
10Scroll down to Custom 6 Paper Type.
11Select envelope for Custom 6 paper type, heavy for Custom 6 paper weight, and rough for
Custom 6 paper texture.
12From the tool bar, click Actions.
13Click Apply to save changes.
14Click File
Æ Exit to close.
Follow these instructions from a Macintosh:
1 From Applications, click Utilities.
2 Select Lexmark Utilities, and double-click Printer Settings.
3 Click Edit Printer List (if the printer is not displayed in the pop-up).
4 Choose Edit Printer List.
5 Select appropriate printer from the list.
6 Click Add.
7 Click Done.
8 Click Edit Printer List again and choose appropriate printer.
9 Select envelope for Custom 6 paper type, heavy for Custom 6 paper weight, and rough for
Custom 6 paper texture.
10Click Quit Printer Settings.
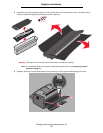
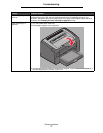
Jam occurs 1 Open the top door. Remove any paper caught in the fuser unit.
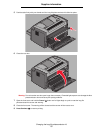
2 Open the rear door by sliding the door release button to the right. Remove any paper
caught in the paper path. Do not leave the rear door open for an extended length of time.
Extended exposure to light can damage the blue photoconductor drum and cause print
quality problems.
3 Open the front door by sliding the door release button to the left. Pull door up until it clicks
into an open position. Remove any paper caught in the paper path. Removal of the toner
cartridge may be necessary to remove paper caught behind the toner cartridge. To remove
the toner cartridge, grasp the handle and pull straight out.
4 Place the toner cartridge on a flat, clean surface. Replace the toner cartridge by sliding
along the guides into the printer.
5 Close all the doors, and press the Continue button to resume the print job.


