


51
Installation & Operation Manual
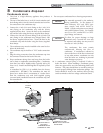
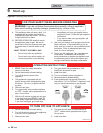
Set Hot Water Generator (HW) operation
Note: For more detailed instructions, please refer to the
Crest Service Manual.
Verify HW mode
There are two (2) modes of operation for HW. In Normal
Mode, when a HW demand begins, the control will start
the HW pump, turn off the boiler pump (if running), and
modulate to bring the outlet temperature to the HW boiler
set point. The maximum firing rate may be limited in this
mode if desired.
In Zone Mode it is assumed that the indirect HW tank is
piped as a zone on the primary loop. When a HW demand
begins, the control will turn on the HW pump output, and
raise the system temperature set point to the HW boiler set
point (if higher). The boiler pump will be turned on. The
system pump may be forced on, forced off, or not changed,
depending on the System Pump Mode selected (reference
the Crest Service Manual for details). In this mode, any
low temperature zones (such as radiant heating) may need
additional controls to limit the water temperature sent to
those zones.
9 Start-up (continued)
Set HW boiler target temperature
When in the HW Mode, the control will modulate to maintain
the boiler outlet temperature or system supply temperature to
a set point. This set point is set at the factory to 180°F. If a
different set point is desired, the appropriate parameter in the
control must be changed. See the Crest Service Manual for a
detailed explanation of this procedure.
Set maximum HW fan speed
If the rated input of the indirect tank is less than the maximum
output of the boiler, change the maximum HW fan speed
setting to limit the boiler output accordingly, see the Crest
Service Manual for a detailed explanation of this procedure.
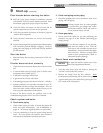
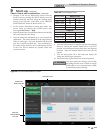
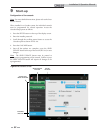
Set clock
The SMART TOUCH control has a built-in clock that it uses
for its night setback feature and for logging events. This clock
must be set when the boiler is installed, and anytime the boiler
has been powered off for more than one day. Use the following
procedure to set the clock:
1. Press the SETUP button (see FIG. 9-5).
2. Enter the installer password.
3. Press the RAPID SETUP button in the menu on the left.
4. Press the SET button next to the time and date on the
Rapid Setup Screen as shown in FIG. 9-5.
SET BUTTON
SCROLLING
MENU FEATURE
RAPID SETUP
BUTTON
Figure 9-5 Rapid Setup Screen