


5
Section 2: Installation
Preparation
The design of the LMF-400 allows convenient mounting in the dash of
your boat, or it can be mounted on any flat panel at least four inches in
diameter.
To mount the LMF-400 in the dash, first make sure there is sufficient
clearance behind the panel in the desired location. Also, see that there is
adequate room to connect power and transducer cables. At least 3-1/2 inches
are needed behind the surface of the dash to clear all connectors and wiring.
Recommended Tools and supplies
Recommended tools for this job include: hole saw, drill, drill bit (for
starter hole). Required supplies for this job include: "U" bracket, lock
washers and wing nuts (included).
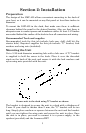
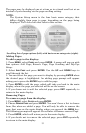
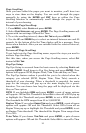
Mounting the Unit
Cut a 3-3/8 inch diameter mounting hole with a hole saw. A "U" bracket
is supplied to hold the sonar to the dash. Place it over the threaded
studs on the back of the unit and secure it with the lock washers and
nylon wing nuts provided with the unit.
Secure unit to the dash using "U" bracket as shown.
The bracket is designed to secure the unit to a dash with a thickness of
2 mm. If your dash is thicker than 2 mm, the "U" bracket will be too
long. Simply place washers or spacers between the unit and the bracket
until you can tighten the wing nuts and secure the unit in place. Once
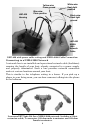
the unit is in place, you need to connect it to a power supply, to the
speaker (provided) and the LowranceNET.