


Chapter 5 AT Serial Hardware Installation, Verification, and Configuration
Serial Hardware and Software for Windows 5-10 ni.com
5. If you need toinstall your hardware, or if this is your first time to install
the NI-Serial software for Windows Me/9x, skip to the next section,
Install the Hardware. Otherwise, continue to Step 6.
6. If your hardware is already installed, restart Windows Me/9x.
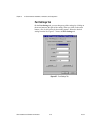
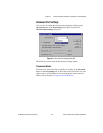
Windows Me/9x should automatically detect your hardware and
display one or more New Hardware Found dialog boxes, but you
must make sureWindows DefaultDriver is selectedand click onOK.
When you finish, continue to the Verify the Installation section.
If no New Hardware Found dialog box appears, refer to the Forcing
Windows to Detect Your Hardware sectioninAppendixD,
Troubleshooting and Common Questions.
Install the Hardware
This section describes how to install your AT serial hardware.
Note
If you are installing a AT-485, you might need to adjust the value of the bias
resistors, depending on your application. For more information, refer to Appendix B,
Serial Port Information.
Caution
Before you remove your board from the package, touch the antistatic plastic
package to a metal part of your system chassis to discharge electrostatic energy, which can
damage several components on your serial board.
To install your AT serial board, complete the following steps:
1. Turn off your computer. Keep the computer plugged in so that it
remains grounded while you install the AT serial board.
2. Remove the top or side cover of the computer.
3. Find an unused AT expansion slot in your computer.
4. Remove the corresponding expansion slot cover on the back panel of
the computer.
5. Touch a metal part on your chassis to discharge any static electricity.
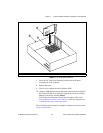
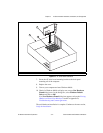
6. Insert the AT serial board into the slot with the serialconnectors toward
the opening on the back panel. Make sure that you insert the board all
the way into the slot. The board might seem to click firmly into place,
even though it is only part of the way in. Figure 5-5 shows how to
install the AT serial board into an expansion slot.