


Chapter 3 PXI Serial Hardware Installation, Verification, and Configuration
© National Instruments Corporation 3-11 Serial Hardware and Software for Windows
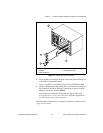
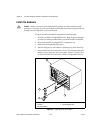
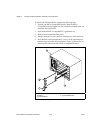
6. Screw the PXI serial board front panel to the front panel mounting rail
of the PXI or CompactPCI chassis.
7. Turn on your PXI or CompactPCI chassis and start Windows Me/9x.
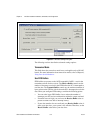
8. Windows Me/9x should automatically detect your hardware and
display one or more New Hardware Found dialog boxes. Make sure
that Windows Default Driver is selected and click on the OK button.
If no New Hardware Found dialog box appears, refer to the Forcing
Windows to Detect Your Hardware sectioninAppendixD,
Troubleshooting and Common Questions.
The serial hardware installation is complete. Continue to the next section,
Verify the Installation.
Verify the Installation
Before you verify the installation, keep in mind that the serial ports
built into your computer are typically named from COM1 to COM4.
Windows Me/9x typically issues port names to the ports on NI serial
hardware starting with COM5, COM6, and so on. If not enough resources
are available to assign to all the NI serial ports, the port with the higher
COMx name is not configured.
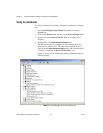
To verify the hardware and software installation, complete the following
steps:
1. Select Start»Settings»Control Panel and double-click on the
System icon.
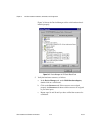
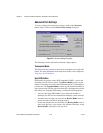
2. ClickontheDevice Manager tabandclickontheView devices by
type button.
3. Double-click on the Ports (COM & LPT) icon to display all of
the ports.
4. Double-click on the Multi-function adapters icon.
The PXI serial boards are configured as devices belonging to the
multi-function adapters class. The multi-function parent device is
listed under the Multi-function adapters icon, and each child device
is listed as a port under the Ports (COM & LPT) icon.