


NTI NODEMUX SERIES UNIVERSAL KVM SWITCH
13
OPERATION
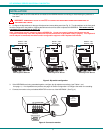
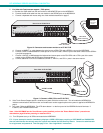
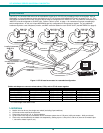
Control over the CPUs attached to the NODEMUX is achieved through operation of the NODEMUX. Once the NODEMUX is
properly connected, the NODEMUX will enable a connection to be made between the CPUs attached to its "VIDEO x" and "CPU
x" ports and the keyboard, monitor, and mouse attached to the "MONITOR" and "DEVICES" ports. The LEDs on the control
panel of the NODEMUX will illuminate depending on which port (and subsequent associated CPU) is being connected to the
keyboard, monitor, and mouse. The choice of which CPU a keyboard, monitor, and mouse will be connected to is determined by
controlling the Universal KVM switch either through the front control panel on the NODEMUX, by keyboard control through an On
Screen Display (OSD) menu, by RS232 control, or by optional Infrared control. An LCD display can also be added to enable
selection and control of CPUs by name.
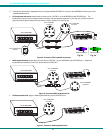
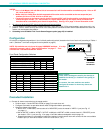
Front Panel Control
There is a touch-switch and LED on the front panel of the NODEMUX for each CPU the switch will connect the keyboard,
monitor, and mouse to. Pressing any touch-switch on the front panel of the NODEMUX will connect the selected CPU to the
keyboard, monitor, and mouse.
Holding down any front panel touch-switch for more than 2 seconds will cause the NODEMUX to cycle through all modes of
operation including COMMAND, SCAN, BROADCAST, and NORMAL (described below and on page 14). The three mode LEDs
on the front panel indicate which mode is selected. Release the touch-switch when the LEDs indicate the desired mode. When
no mode LEDs are illuminated the user is in Normal Mode controlling directly the CPU to which the user is connected through the
NODEMUX.
Keyboard Control
Keyboard control of the NODEMUX can be achieved through either of two methods:
• Basic Command Mode - operated by using keyboard commands as instructed below. Basic Command Mode is only
applicable if the OSD option is not built into the switch.
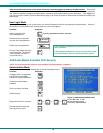
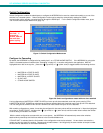
• OSD Command Mode - OSD Command Mode is operated using the keyboard and mouse in conjunction with On Screen
Display (OSD) menus superimposed onto the monitor. If OSD is built in, use the menus as instructed on page 14.
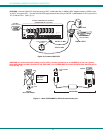
By pressing <Ctrl> + <`> (accent key), the user can enter Command Mode (either Basic, or OSD). Once in Command
Mode, typing a series of commands will cause the Universal KVM switch to connect the user to any one CPU connected to the
switch. Pressing the <Esc> key will exit Command Mode.
Basic Command Mode
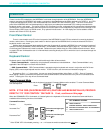
In order to control the NODEMUX with the keyboard connected, Command Mode must be enabled. To enter Command Mode
from the keyboard:
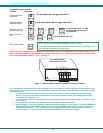
Press
NOTE: IF THE OSD (ON SCREEN DISPLAY) FEATURE HAS BEEN INSTALLED, PROCEED
DIRECTLY TO “OSD CONTROL” ON PAGE 15. If not, continue on this page.
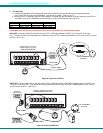
When the COMMAND LED is illuminated, all 3 status lights on the keyboard will illuminate to indicate that Command Mode is
enabled and the following functions are available:
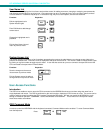
Command Functions
Function: Keystroke:
Increment Port
1
Decrement Port
1
1
If the “SCAN” LED is illuminated, pressing → or ← will cause the switch to select the next active port.
`
+
Ctrl
~
(ACCENT
KEY)
`
I
(select the next higher port
ex. 05 06)
or
D
or
(select the next lower port
ex. 02 01)
CHORDED SEQUENCE- PRESS CONSECUTIVELY
AND KEEP KEYS PRESSED UNTIL ALL ARE PRESSED
+
-
PRESS CONSECUTIVELY
or
PRESS EITHER KEY
KEY SYMBOLS LEGEND: