


NTI RACK MOUNT CONSOLE TERMINAL WITH CONSOLE SWITCH
60
4.6 Using Printer Server via Ethernet Connection
Introduction
In order to send print jobs to a network-based printer, the Ethernet Print Terminal function in the TERMINAL must be used. To
use this function, the Telnet Terminal communication option described on page 1 is available. For this option to work, an
Ethernet cable must be connected as described on page 6.
There are two ways to send the print jobs to a network-connected printer: 1) through LPD protocol, and 2) through TFTP protocol.
• The LPD method is more suitable for printing environments with a large number of users because the LPD
protocol has a queue process so print jobs will be kept in the print queues in the CPU.
• TFTP does not implement the print queue concept; if the printer port is not ready for accepting new print jobs, TFTP
will be terminated. Consequently, the user must send the print job again. As a result, the TFTP protocol is suitable for
printing small jobs, in an environment with a small number of users, or for testing purposes.
LPD is a built-in printing protocol in the BSD type of UNIX and is also available in most other UNIX systems. With LPD, users do
not need to install additional software to the CPU to print the jobs. Most implementations of the LPD protocol send out the data file
before the control file. However, since Ethernet Print Terminal must print the data file immediately upon receiving it, the print
option specified in the control file cannot take affect.
To install the printer server function of Ethernet Print Terminal, the first step is Basic setup. Whichever printing protocol will be
used, it is necessary to run basic setup first. If LPD will be used to print jobs, go through the Setup for LPD procedures. If TFTP
will be used, go through the Setup for TFTP procedures.
4.6.1 Basic Setup
Because the TCP/IP world uses IP addressing to communicate with each other, the purpose of Basic Setup is to assign an
IP address to the Ethernet Print Terminal.
For the purpose of this explanation, assume the following:
(1) Login to the UNIX CPU as root
(2) The Ethernet Print Terminal is on the same network segment that the printer resides.
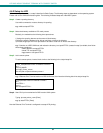
Step 1. Add the Print Server to /etc/hosts
Create a new entry in the /etc/hosts file on all UNIX CPUs that are slated to work with Ethernet Print Terminal.
To create a new entry, add the following line:
IP_Address PS_NAME # comment
where: IP_Address is an IP address.
PS_NAME is a CPU name of a print server.
The statement after # is the comment for the new entry.
e.g. 90.3.2.2 ETPS1 # Ethernet Terminal
This example assigns the name ETPS1 to the Ethernet Print Terminal with IP address 90.3.2.2.
NOTE: The IP address is defined in setup Screen of Ethernet Print Terminal, as a Local IP address. Use the same one.
Step 2. Check to see if above steps are completed
To verify if the IP address of print Server function is installed successfully, issue the following ping command:
ping PS_NAME [Enter]
e.g. ping ETPS1 [Enter]