


NTI RACK MOUNT CONSOLE TERMINAL WITH CONSOLE SWITCH
63
4.7 On-Screen Display (OSD)
4.7.1 Standard Controls
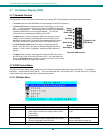
The RACKMUX LCD has 5 standard control buttons and a power LED. The 5 standard control buttons operate as follows:
• The Power button turns the RACKMUX LCD and backlight ON and OFF as desired.
• The Power LED located immediately below the Power button is a dual color
LED. It will illuminate with a green color when the RACKMUX is powered
ON and working properly. It will illuminate with a red color if the RACKMUX
is powered ON but there is no input signal detected. The LED will
illuminate red only momentarily just before turning OFF.
• The Menu button is used to bring up the OSD menu where the various
settings of the LCD display can be adjusted. Once the OSD screen is
displayed, the Menu button is used to make selections within the menus.
See "OSD Control Menu " (below) for more on LCD display settings.
• The Up and Down Arrow buttons are used to navigate through the
menus. Move the cursor up or down as desired to highlight an item for
selection. Once an item is highlighted, pressing the Menu button will
select it.
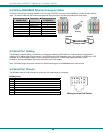
Figure 26- OSD Controls
• The Select button is used to make selections within the OSD menus when
the OSD menu is ON. When the OSD menu is OFF, the Select button will
act as an Auto Adjust button to keep the user from having to use the menus
to adjust the quality of the image on the monitor.
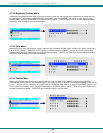
4.7.2 OSD Control Menu
The OSD (On Screen Display) Menu enables the user to select the desired characteristics of the LCD display. To activate the
OSD Menu, press the Menu button (above). To turn the Menu back OFF, either select "EXIT" from the main menu or just wait
10-60 seconds and it will automatically be cleared from the screen.
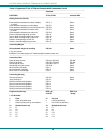
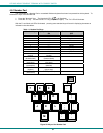
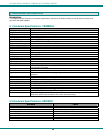
4.7.2.1 OSD Main Menu
Selection Purpose Range
Brightness/Contrast Increase/decrease panel brightness/contrast level 1-100
Color R,G,B color temperature control 1-100
Position
• Auto Adjust
• Video Image horizontal and vertical position control
• Clock setting
• Phase control
1-100
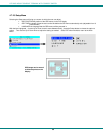
Setup
• Control OSD Image position on screen
• Set time OSD will stay on screen before auto shutoff
• Select the language of the OSD menu
--
10 to 60 seconds
Several languages (see page 40)
Exit Exit from the OSD control menu
Power
ON/OFF
Menu
Up Arrow
Select/
Auto Adjust
Power LED
Down Arrow
Controls for the
OSD Menus