


NTI RACK MOUNT CONSOLE TERMINAL WITH CONSOLE SWITCH
61
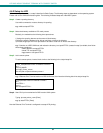
4.6.2 Setup for LPD
Follow those steps from step 1 to step 2 described in Basic Setup. The following steps are dependent on the operating system.
Please refer to the UNIX administration guide. The following illustrated steps are under BSD system.
Step 3. Create a spooling directory
Use mkdir command to create a directory for spooling.
e.g. mkdir/usr/spool/ETPS1
Step 4. Make the directory available to LPD main process
Basically, the method has the following three procedures:
1) Assign the spooling daemon as the owner of this directory.
2) Allow the spooling daemon to be able to read from or write to the directory.
3) Enable the group of LPD main processes to be able to read from or write to the directory.
e.g. If it works on a BSD UNIX host and makes the directory /usr/ spool/ETPS1 (created in step 3) available, then follow
these three procedures:
chown daemon /usr/spool/ETPS1
chmod 775 /usr/spool/ETPS1
chgrp daemon /usr/spool/ETPS1
Step 5. Add a remote printer
To add a remote printer, insert a block similar to the following in the /etc/printcap file.
Printer_name|Remote Printer on Ethernet Terminal:\
:lp=:\
:rm=PS_NAME:\
:rp=Logic_Printer_name:\
:sd=<full path of spooler directory name>:\
e.g. If Ethernet Print Terminal works on a BSD UNIX host, then insert the following block into /etc/printcap file.
ETPS1|Remote Printer on Ethernet Terminal:\
:lp=:\
:rm=ETPS1:\
:rp=L1:\
:sd=/usr/spool/ETPS1:\
Step 6. Start CPU's print mechanism for BSD version UNIX system
Typing: lpc start printer_name [Enter]
e.g. lpc start ETPS1 [Enter]
Now the Ethernet Print Terminal is configured to accept LPD printing..