


Installation
DRAFT
E Copyright Nokia Telecommunications Oy
NTC C33539002SE_A0
4-3
The Internet access application requires that your PC uses Dynamic
Host Configuration Protocol (DHCP) to get its network address (IP
address) from your Nokia M10.
The installation procedure depends on whether you want to use data
services only or data and simultaneous telephone services. If you want
data services only start from the Step 1a. Start from Step 1b if you want
both data and telephone services.
M10 has an optional three-level password (user, user-admin, and
admin) which also affects the installation procedure. By default, the
password is disabled but it can be enabled through the command line
interface (see Chapter 5 Management). Steps 4b and 5b describe the
actions when password is enabled.
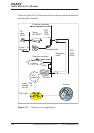
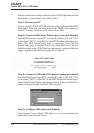
Step 1a: Connect cables (data services only)
Connect the following cables:
D Connect the mains power cord first to the Nokia M10 and to a
power outlet.
D Connect the Ethernet cross cable to the Nokia M10 ETH connector
and the other end to your PC’s Ethernet port.
D Connect the ADSL cable to the telephone socket.
D Go to Step 2.
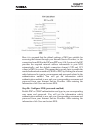
Step 1b: Connect cables (data and telephone services)
If you want to use your telephone line for both the high-speed ADSL
service and normal telephone service you must install a POTS filter.
You can use Nokia POTS filter T66130 or T66150. See separate
installation instructions for POTS filters.
Connect the following cables:
D Connect the mains power cord first to the Nokia M10 and to a
power outlet.
D Connect the Ethernet cross cable to the Nokia M10 ETH connector
and the other end to your PC’s Ethernet port.
D Connect the ADSL cable and the telephone according to the
separate POTS filter installation instructions.
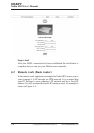
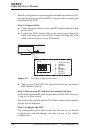
Step 2: Switch power on
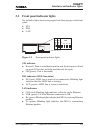
Turn the Nokia M10 on. The green STA indicator and red DSL
indicator light up. After a while the DSL light starts blinking indicating