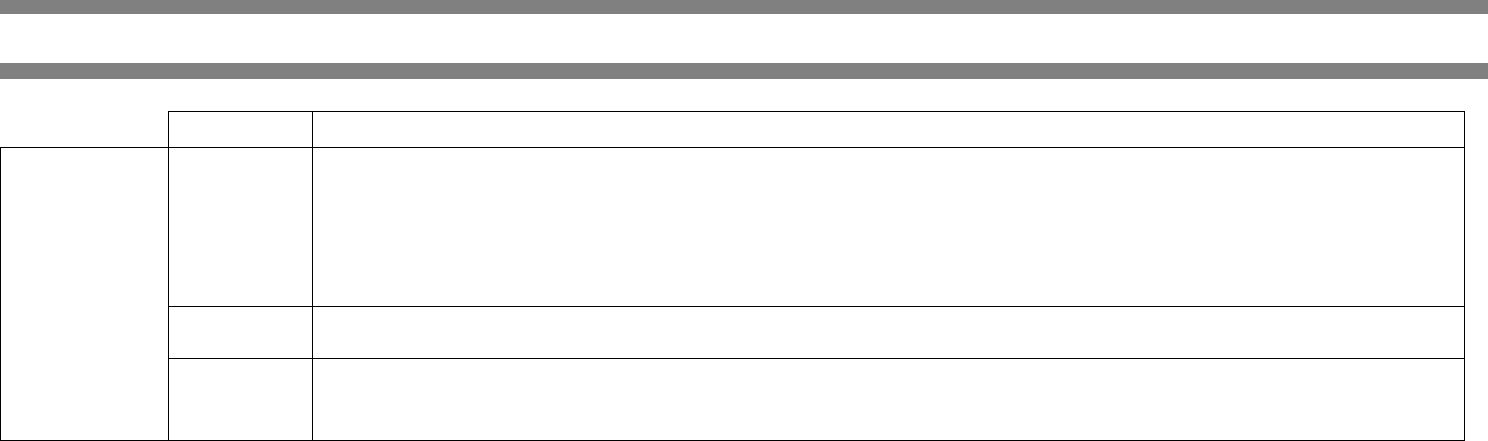
Oki B8300 Printer User Manual


<Parts included>
Staple unit: 1 pc.
Connecting plate:
1 pc.
Front grounding
plate: 1 pc.
Rear grounding
plate: 1 pc.
Front cover:
1 pc.
Screws C
Screws C
Exterior
fixing screw
Exterior
fixing screw
Front grounding plate
Rear grounding plate
<1> Remove the screw from the
right side of the duplex module.
<2> Attach the lock securing
plate to the duplex module
using the screws C and D (one
for each).
9. Paste the stapling position labels.
Paste the labels to the positions
shown in the illustration.
<1> Attach the plate R to
the position shown in the
illustration and secure it
using two screws A.
<2> Attach the front cover
to the finisher, and secure
the upper part using two
screws B and the lower
part using two screws A.
<1> Remove the two pieces of
packing tape from the locations
shown in the illustration.
Packing tape
Packing tape
B83SS Installation Manual
FOR USE WITH COMPATIBLE OKI DIGITAL PRINTERS.
SEE OKI DIGITAL PRINTER SERVICE MANUAL OR
INSTALLATION MANUAL TO DETERMINE SUITABILITY.
<Before installation>
For installation of B83SS, an optional stand/paper drawer
(stand/MPD & 2000 sheet drawer or stand/3 x 500 sheet paper
drawer) and a duplex module B83D must have been installed. Also a
power supply unit is needed.
Plate R: 1 pc.
Lock securing plate:
1 pc.
Screws A
(M4x6):
6 pcs.
Screws B
(M4x10):
2 pcs.
Screws C
(M4x18):
7 pcs.
Screws D
(M4x10 with rosette):
1 pcs.
"OFF"
1. Turn off the main switch of the main unit of the printer.
Turn the main switch located
on the front side of the main
unit to the "OFF" position.
Then remove the power plug
of the main unit from the outlet.
Screw D
Screw C
Lock securing plate
Screw
3. Work the stand/paper drawer.
Mounting
holes
Mounting
holes
Left adjuster
Remove the two screws
that fix the exterior of
the stand/paper drawer.
Then, attach the front
mounting plate and the
rear mounting plate to
the stand/paper drawer
using screws C (two for
each).
4. Attach the grounding plate to the stand/paper drawer.
5. Install the staple unit to the finisher.
<2> Open the front cover of the
finisher and insert the staple unit.
Front cover
Screws A
Screws A
Screws B
Plate R
7. Connect the finisher to the stand/paper drawer.
<1> Remove the cover from
the finisher stand.
<2> Attach the connecting
plate to the finisher using two
screws A.
<3> Reattach the cover to its
original position.
Cover
Screws A
Screws C
Connecting plate
Stand/paper drawer
8. Check and adjust the height of the finisher.
Guide pin
Connecting
hole
Move the finisher toward the printer
and check to see if the guide pin of
the locking plate is inserted
smoothly to the connecting hole of
the finisher.
If it is not inserted smoothly, use
the following procedure to adjust
the height.
2. If the guide pin of the locking plate matches to the connecting hole
of the finisher:
Finisher stand
Gap
Gap
Sub cover
Sub cover
Screw
Screw
Screw at adjusting portion
Height
adjusting screw
Screw at adjusting portion
Cap
Cap
Front side
Rear side
Height
adjusting
screw
Height adjusting
screw
Screw at
adjusting
portion
Screw at adjusting portion
Cap
Cap
Front side
Rear side
Front cover
Exterior lines
Exterior lines
10. Remove the AC inlet cover from the rear cabinet of the
stand/paper drawer.
Remove the screw that fixes
the AC inlet cover and then
remove the AC inlet cover.
Screw
AC inlet cover
11. Connect the finisher connector.
<1> Connect the finisher
connector to the stand/paper
drawer.
<2> Tighten the screw of the
connector.
Screw
Connector
12. Turn on the main switch of the main unit.
Insert the power plug of the
main unit to the outlet.
Turn on the main switch of the
main unit.
Installation is now complete.
"ON"
2. Attach the lock securing plate to the duplex module.
6. Attach the cover to the finisher.
Stapling position labels:
2 sheets
Open the pawl of the left
adjuster to both sides to unlock
it that is located at the lower left
of the stand/paper drawer and
remove the left adjuster.
Cut out the two mounting holes
of the stand/paper drawer using
a screwdriver or the like and
remove burrs using a flat-blade
screwdriver or the like.
Pawl
Connecting plate
Finisher stand
1. If the guide pin of the lock securing plate is not aligned with the
connecting hole of the finisher:
<1>Push the finisher into the
main unit.
<1> Loosen the screw at
the rear adjusting portion.
<2> Remove the cap using
a flat-blade screwdriver or
the like and adjust the
height adjusting pin so that
the guide pin is positioned
to the center of the
connecting hole of the
finisher.
<3> Loosen the screw at
the front adjusting portion.
<4> Adjust the height
adjusting pin so that the
exterior lines are aligned
as shown in the illustration.
<5> If the guide pin can be
inserted smoothly, tighten
the screws at the front and
rear adjusting portions and
mount the caps.
<2>If the gap between the
main unit of the printer and
the finisher is not uniform at
the top and the bottom,
remove the caps from the
front side and the rear side of
the finisher stand using a flat-
blade screwdriver or the like
and remove the screw of the
sub covers on the front side
and the rear side to remove
the sub covers.
<3>Then, loosen the four
screws at the adjusting
portions indicated in the
illustration and turn the height
adjusting screws on the front
side and the rear side so that
the gap becomes uniform.
<4>If the gap becomes uniform, tighten the screws at the adjusting
portions and reattach the caps and sub covers.
<4> Cut out the two mounting
holes for the connecting plate at
the lower part of the stand/paper
drawer in a similar way to step 3.
<5> Attach the finisher
connecting plate to the
stand/paper drawer using two
screws C.
11