


133
Color Calibration
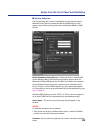
4)Press the Continue/Forward or Cancel/Left button
to darken/lighten the cyan color.
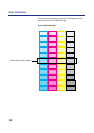
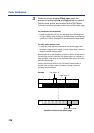
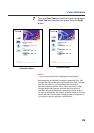
To make the color density setting of the Color Calibration Page
darker or lighter by 1 level, increase or decrease a value of the
CYAN density by 3 by pressing the Continue/Forward or Cancel/
Left button.
For example when the CYAN density is 0:
• If you wish to make the density setting darker by 1 level:
—Select 3 by pressing the Continue/Forward button 3 times.
• If you wish to make the density setting lighter by 1 level:
—Select –3 by pressing the Cancel/Left button 3 times.
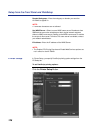
5)Press the Enter button.
MAGENTA is displayed in the LCD panel.
6)Repeat steps 3) through 5) for each color
(MAGENTA, YELLOW, BLACK).
•
To skip a color, press the Continue/Forward button.
• To return to a previous color, press the Cancel/Left button.
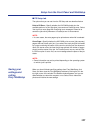
• Before going to step 2, make sure the following is displayed.
Calibration Test Print is displayed in the LCD panel.
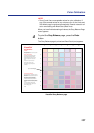
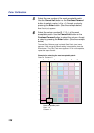
2
Press the Enter button to reprint the Color Calibration
Page.
•
The line enclosure reflects the changes made to the settings.
• If you are not satisfied with the current color density settings,
repeat the steps above.
NOTES:
• Changes made using Bias Adjustment are retained until the printer is
recalibrated.
• The color density setting affects the average life of toner.
• Save the Color Calibration Card for future calibrations.