


74
Connecting the Printer to a Network
4
Use the
▲
/CONTINUE
button to select a number in a
valid, unique IP Address for the KX-PS8100. Press
⁄⁄
⁄⁄
/CANCEL
button to accept a number and move to the
left—to the next number.
NOTE:
•
On the printer, numbers are entered from right to left. Press the
▲
/CONTINUE button to scroll through numbers from 0 to 9.
Press the
⁄
/CANCEL button to accept a number and move to the
next.
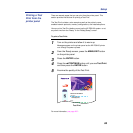
5
When you have finished entering all numbers in the
address, press
ENTER
button to advance to the
Subnet
Mask
screen. Press
ENTER
.
6
Use the
▲
/CONTINUE
button to select a number as the
Subnet Mask value for the KX-PS8100. Press
⁄⁄
⁄⁄
/CANCEL
button to accept a number and move to the
left—to the next number.
7
Specify the Gateway Address in the printer’s Setup
menus, if needed.
See “Network Protocol Setup” on page 148 for details.
8
When you have finished entering all numbers, press
MENU/EXIT
button.
After being rebooted, the printer will return to Ready mode.