


Chapter 6 Appendix — Ceiling mount bracket safeguards
136 - ENGLISH
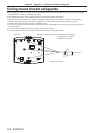
Ceiling mount bracket safeguards
f When installing the projector to a ceiling, be sure to use the specied ceiling mount bracket (Model No.: ET-PKR100H (for high ceilings),
ET-PKR100S (for low ceilings), ET-PKR100P (for portrait)).
f When installing the projector, attach the drop-prevention kit included with the ceiling mount bracket.
f Ask a qualied technician to do the installation work such as mounting the projector on the ceiling.
f Panasonic takes no responsibility for any damage to the projector resulting from use of a ceiling mount bracket not manufactured by
Panasonic or the inappropriate choice of location for installation, even if the warranty period of the projector has not expired.
f Unused products must be removed promptly by a qualied technician.
f Use a torque screwdriver or Allen torque wrench to tighten bolts to their specied tightening torques. Do not use electric screwdrivers or
impact screwdrivers.
f For details, read the installation manual that comes with the ceiling mount bracket.
f The model numbers of accessories and optional components are subject to change without notice.
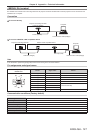
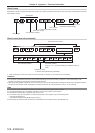
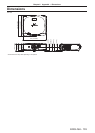
M4
10 mm (13/32")
Bottom view Model No. of ceiling mount bracket: ET-PKR100H (for high ceilings)
ET-PKR100S (for low ceilings)
ET-PKR100P (for portrait)
Torque: 1.25 ± 0.2 N·m