


Setting
58
- ENGLISH
Settings
Logo
This function allows you to customize the screen logo
with [Logo select], [Logo PIN code lock] and [Logo
PIN code change] functions.
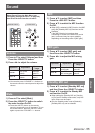
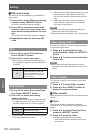
Press ▲▼ to select [Logo].1 )
Press ► or the <SELECT> button.2 )
Press ▲▼ to choose the desired item.3 )
Logo select
J
This function decides on the starting-up display from
among following options.
Off
Show the countdown display only.
Default
Show the factory-set logo.
User
The logo transferred by “Logo
Transfer Software *
1
” is projected.
“Logo Transfer Software” is included on the *1 :
supplied CD-ROM.
Logo PIN code lock
J
This function prevents an unauthorized person from
changing the screen logo.
Off
The screen logo can be changed freely
from the Logo Menu.
ON
The screen logo cannot be changed
without a Logo PIN code.
Note
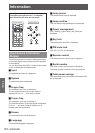
You can enter a Logp PIN code through the control panel
z
or the remote control. For details, please refer to "Enter a
PIN code" (
Æ
page 32).
If you want to change the [Logo PIN code lock] setting,
z
press the <SELECT> button and the [Logo PIN code]
dialog box appears. Enter a [Logo PIN code] by following
the steps below. The initial [Logo PIN code] is set to
“4321” at the factory.
Logo PIN code change
J
Logo PIN code can be changed to your desired four-
digit number.
Press ▲▼ to select [Logo PIN code 1 )
change].
Press the <SELECT> button.2 )
[Current logo PIN code] dialog box appears.
z
Press ▲▼ to enter the current code.3 )
The [New Logo PIN code] input dialog box
z
appears. Set a new [Logo PIN code], a
conrmation box appears, choose [Yes] to set
the new [Logo PIN code].
Attention
Be sure to note the new [Logo PIN code] and keep it on
z
hand. If you lost the number, you could no longer change
the [Logo PIN code] setting.
HDMI setup
This function is only used for HDMI input source.
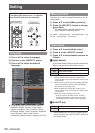
Press ▲▼ to select [HDMI setup].1 )
Press ► or the <SELECT> button.2 )
The names for the output setting of Digital R/G/
z
B vary from equipment to equipment.
Press ▲▼ to choose the desired item.3 )
Image
J
Normal
When the output of Digital R/G/B
equipment is set to Standard.
Enhanced
When the output of Digital R/G/B
equipment is set to Enhanced.
Sound
J
HDMI
When Digital input source is input,
[Sound] is set to [HDMI].
Computer
2
When DVI input source is changed
to HDMI input source, [Sound] is set
to [Computer 2].
Attention
For details, refer to the operating instructions of your
z
Digital R/G/B equipment.
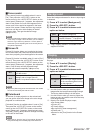
USB terminal
Press ▲▼ to select [USB terminal] and 1 )
then press the<SELECT> button.
Press ▲▼ to choose the desired item.2 )
Display
To display the image when the
input source comes from the USB
terminal.
Mouse
control
To use the remote control as a
mouse control.