


Removal and replacement procedures 41
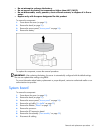
• Do not attempt to recharge the battery.
• Do not expose the battery to temperatures higher than 60°C (140°F).
• Do not disassemble, crush, puncture, short external contacts, or dispose of in fire or
water.
• Replace only with the spare designated for this product.
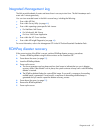
To remove the component:
1. Power down the server (on page 25).
2. Remove the bezel (on page 25).
3. Remove the access panel ("Access panel" on page 26).
4. Remove the battery.
To replace the component, reverse the removal procedure.
IMPORTANT: After replacing the battery, the server is automatically configured with the default settings.
The user can update these settings using RBSU.
For more information about battery replacement or proper disposal, contact an authorized reseller or an
authorized service provider.
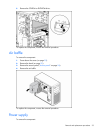
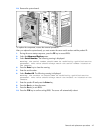
System board
To remove the component:
1. Power down the server (on page 25).
2. Remove the bezel (on page 25).
3. Remove the access panel ("Access panel" on page 26).
4. Remove the air baffle ("Air baffle" on page 33).
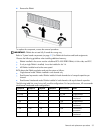
5. Remove the DIMMs ("DIMM" on page 34).
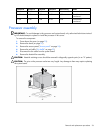
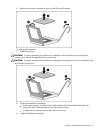
6. Remove the processor.
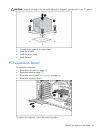
7. Remove the PCI expansion board.
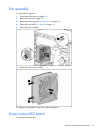
8. Remove the fan assembly ("Fan assembly" on page 39).
9. Disconnect all cabling.