


2-4 Pitney Bowes DA500/DA550 Operator Guide
2 • Setting Up the DA500/DA550 Printer
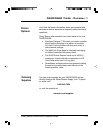
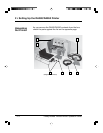
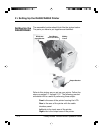
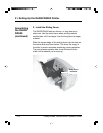
The assembled printer should look like the picture below.
The parts you have to put together are identified.
Refer to this picture as you set up your printer. Follow the
steps on pages 2-7 through 2-15. The following product
orientation will be useful in performing these steps:
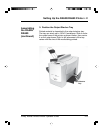
Front is the area of the printer housing the LCD.
Rear is the area of the printer with the cable
interface panel.
Left side is the input area of the printer.
Right side is the output area of the printer.
Setting Up the
DA500/DA550
Feed Ramp
and Lock Knob
Sliding
Fence
Wireframe
Input Stacker
Output Stacker