


30
Maintenance
Caution: To prevent equipment damage,
use only authentic Robinair No. 34724
lters in this machine. All performance
tests and claims are based on using this
specic lter.
WARNING: To prevent personal
injury while working with
refrigerant, read and follow the
instructions and warnings in
this manual, and wear protective
equipment such as goggles and
gloves.
Filter Change
Thelterisdesignedtotrapacidandparticulates,
andtoremovemoisturefromrefrigerant.Tomeet
themandateforadequatemoistureandcontaminant
removal,theltermustbereplacedafter150kg
(331lbs.)ofrefrigeranthasbeenltered.
Themachinegivesawarningwhen100kg(220lbs.)
oftheltercapacityhasbeenused;themachinelocks
downwhenthe150kg(331lb.)ltercapacityhasbeen
reachedandwillnolongerfunction.
WARNING: The components in the machine are
under high pressure. To prevent personal injury,
change
the lter only when the machine prompts.
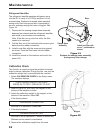
Check Remaining Filter Capacity
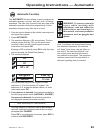
1.SelectFILTER CHANGEfromtheSetupMenuor
whenthemachineprompts.Themachinedisplays
FILTERLIFETIME:X.XXKG
REPLACEFILTER?
Themachinedisplaystheamountofltercapacity
remaininguntilthemachinelocksdown.
2.Whenprompted,selectOKtochangethelter;
selectESC toresumeusingthemachine.
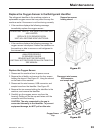
Replace the Filters and Sample Hose Assembly
1.IfOK wasselectedtochangethelter,themachine
clearsthelter,thenpromptsforthenewltercode
tobeentered.
WAITINGFORFILTERTOBECLEARED
SERIALNR.FILTER
Usethekeypadtoentertheserialnumberthat
appearsonthenewlterandselectOK.IfSERIAL
NUMBERWRONGisdisplayed,theserialnumber
hasbeenincorrectlyentered,orthelterhasalready
beenusedinthismachine.
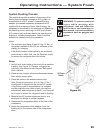
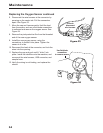
2.Themachinedisplays
TURNUNITOFF
REMOVESHROUDANDREPLACEFILTER,
IDENTIFIERFILTER,AND
IDENTIFIERSAMPLEHOSE
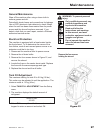
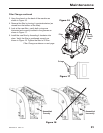
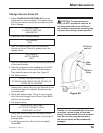
Shutoffthemachine.Removetheoilbottle.Remove
thefourscrewsholdingtheshroud.SeeFigure15.
Figure 15
Remove the four screws
holding the shroud.