


Network setup (CLP-320N(K)/CLP-321N/CLP-325W(K)/CLP-326W only)_ 36
example, 00:15:99:29:51:A8 becomes 0015992951A8.
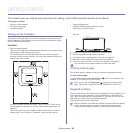
•IP Ad
dress: Enter a new IP address for your printer.
For example, if your computer’s IP add
ress is 192.168.1.150,
enter 192.168.1.X. (X is number between 1 and 254 other than
the computer’s address.)
•Su
bnet Mask: Enter a Subnet Mask.
•Default Gateway: Ent
er a Default Gateway.
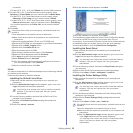
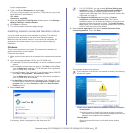
6.Select Apply, then OK, an
d OK again. The printer will automatically
print the configuration report. Confirm that all the settings are correct.
Quit Safari. You may close and eject the installation CD-ROM. If
necessary, restart the computer’s firewall. You have successfully
changed the IP address, subnet mask, and gateway.
IPv4 setting using SetIP Program (Linux)
SetIP program should be automatically installed during the printer driver
installation.
The path and UIs may differ by Linux OS version. Refer to the
Linux OS manual to turn firewall off.
1.Print the machine’s network configuration report to find your machine’s
MAC address.
2.Ope
n the /opt/Samsung/mfp/share/utils/.
3.Doub
le click the SetIPApplet.html file.
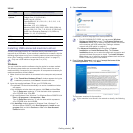
4.Click to
open the TCP/IP configuration window.
5.Ente
r the network card’s MAC address, IP address, subnet mask,
default gateway, and then click Apply.
When you enter the MAC address, enter it without a colon(:).
6.The
machine prints the network configuration report. Confirm all the
settings are correct.
7.Close the SetIP prog
ram.
IPv6 configuration
TCP/IPv6 is supported properly only in Windows Vista or higher.
If the IPv6 network seems to not be working, set all the network setting
to the factory defaults and try again (See "Restoring factory default
settings using SyncThru™ Web Service" on page 36).
To use the IPv6 network environment, follow the next procedure to use the
IPv6 address.
The machine is provided with IPv6 feature on.
1. Connect your machine to the network with a network cable.
2. T
urn on the machine.
3. Pr
int a Network Configuration Report from the machine’s control
panel that will check IPv6 addresses.
4. Select Start > Control Panel > Hardware and Sound > Printers > Add
Printer.
5. Click Add
a local printer on the Add Printer windows.
6. Fol
low the instruction on the window.
If the machine does not work in the network environment, activate
IPv6. Refer to the next section followed by.
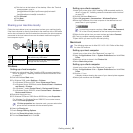
Printing network configuration report
You can print a Network Configuration Report from the machine's
control panel that will show the current machine’s network settings. This
will help you to set up a network and troubleshooting problems.
To print the report:
In ready mode, press and hold the
(cancel button) for about 5
seconds. You can find your machine’s MAC address and IP address.
For example:
•MAC Ad
dress: 00:15:99:41:A2:78
•IP Add
ress: 192.0.0.192
Setting IPv6 addresses
Machine supports following IPv6 addresses for network printing and
managements.
•L
ink-local Address: Self-configured local IPv6 address. (Address
starts with FE80.)
•Stateless Address: Automatically configured IPv6 address by a
network router.
•Statefu
l Address: IPv6 address configured by a DHCPv6 server.
•Manu
al Address: Manually configured IPv6 address by a user.
Manual address configuration
1.Start a web browser such as Internet Explorer that supports IPv6
addressing as a URL (See "SyncThru™ Web Service" on page 34).
For IPv4, enter the IPv4 address (http://xxx.xxx.xxx.xxx) in the
address field and press the Enter key or click Go.
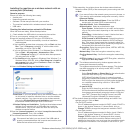
2.When the SyncThru™ Web Service window opens, click Network
Settings.
3.Click TCP/I
Pv6.
4.Ena
ble the Manual Address In the TCP/IPv6 section.
5.Select the Ad
dress/Prefix and click the Add button, then the router
prefix will automatically be entered into the address field.
Enter the rest of address. (ex: 3FFE:10:88:194::AAA
A. “A” is the
hexadecimal 0 through 9, A through F.)
6.Click the Appl
y button.
Installing printer driver
Driver installation for network printer in IPv6 network environment is
same as TCP/IPv4 (See "Installing network connected machine’s driver"
on page 37).
Select TCP/IP Port and when the list
of machines are displayed, simply
select your machine's IPv6 address.
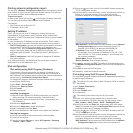
Using SyncThru™ Web Service
1.Start a web browser such as Internet Explorer that supports IPv6
addressing as a URL.
2.Se
lect one of the IPv6 addresses (Link-local Address, Stateless
Address, Stateful Address, Manual Address) from Network
Configuration Report.
3.Enter the IP
v6 addresses. (ex: http://[FE80::215:99FF:FE66:7701])
Address must be enclosed in '[]' brackets.
Restoring factory default settings using SyncThru™
Web Service
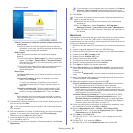
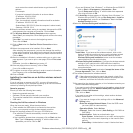
1. Start a web browser such as Internet Explorer, Safari or Firefox and
enter your machine’s new IP address in the browser window.
For example,
2. Click Go to access the SyncThru™ Web Service.
3. Click Lo
gin on the upper right of the SyncThru™ Web Service website.