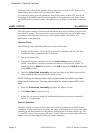
To remove the roll from the spindle, first set the power switch to OFF. Remove the
metal clamp, then remove the rewound roll of labels.
To unwind for using with an applicator, first set the power switch OFF. Attach the
lead edge of the labels from the rewind spindle to the applicator entry point. Select
the WIND option on the rewinder, and when ready to begin, set the power switch to
ON.
LABEL CUTTER ALL MODELS
The label cutter consists of an internal mechanism that will cut labels or tags as they
exit from the printer. The cutter can be used to print labels of various lengths using
continuous form label/tag stock or to easily separate labels when there is no
perforation at the label gap.
Operator Setup
The following steps should be taken to set up the label cutter.
1. Install the label cutter, following the instructions provided with the unit. The
installation time is approximately 20 minutes.
2. Power the printer ON.
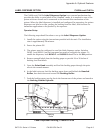
3. The printer must be configured to use the Label Cutter option. Switches
DSW3-1 and DSW3-2 on the front panel are used to configure the printer. To
enable the cutter, DSW3-1 should be in the ON position and DSW3-2 should be
in the OFF position.
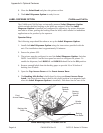
4. Open the Print Head Assembly and feed the edge of the labels/tags into the
cutter assembly and out between the label cutters.
NOTE: Although the cutting blade is fairly well protected, be careful as you feed
labels into the cutter area. You may want to have the printer powered OFF at this
point.
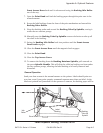
5. Close the Print Head Assembly and place the printer on-line.
6. The Label Cutter is ready for use.
7. Adjust the cut position using the backfeed adjustment procedures outlined in
Section 3: Configuration.
General Operation
The data stream to be sent to the printer may need to be altered to add the Cutter
Command. If this command is not used, the cutter will default to cut after every label
assuming it has been enabled in the printer configuration. For more details, see the
“e” and PRO Printer Programming Reference. As the labels are printed, they will be cut
based on the the data supplied using the cutter command.
Page A-2 PN 9001074 Rev. B SATO CL Series “e” Printers
Appendix A: Optional Features


