Replacing Consumables and Maintenance Kit
8
1
K
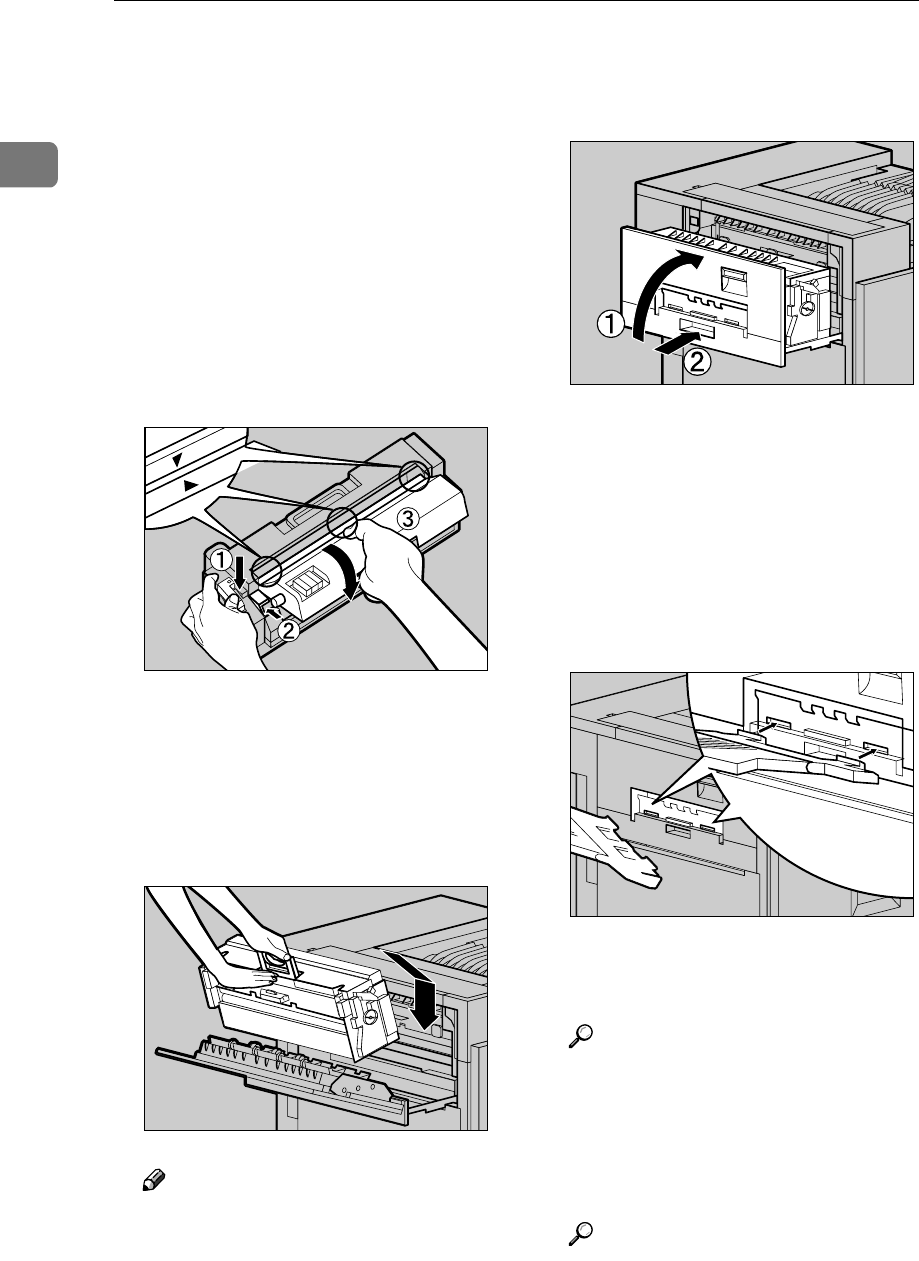
Hold the Fuser Oil Unit in the
manner shown in the illustration.
Match (U
UU
U) on the front of the Fus-
er Oil Unit and (T
TT
T) on the Fusing
Unit at three places. While push-
ing the green lever on the left side
of the Fusing Unit (A
AA
A), insert the
left and right protrusions of the
Fuser Oil Unit into the white
holders of the Fusing Unit (B
BB
B),
and then move the Fuser Oil Unit
in the direction shown by the ar-
row (C
CC
C) to attach the Fuser Oil
Unit to the Fusing Unit.
L
Holding the green handle with
one hand, use your other hand to
push the front area of the handle
to create a slight slant, and push
the Fusing Unit slowly to the
back.
Note
❒ Confirm that the Fuser Oil Unit
is facing the inside of the print-
er.
At this point, make sure the Fusing
Unit is on the stand properly.
M
Close the upper left cover (A
AA
A) and
push the handle slowly (B
BB
B) to the
back until it clicks into place.
N
Place the old Fuser Oil Unit into
the bag which contained the new
Fuser Oil Unit, and seal the bag.
O
If you removed the External Tray
in step
D
, reattach it to the printer.
Insert the hooks of the External
Tray into the printer slits, and
lower it toward you.
P
If the Duplex Unit is installed,
close the Duplex Reversal Unit.
Reference
See P.2 “Opening and Closing the
Duplex Reversal Unit”
Q
If the 2 Tray Finisher was in-
stalled, reattach the 2 Tray Finish-
er to the printer.
Reference
See P.1 “Detaching the SR770 (2
Tray Finisher)”
ZDJH054E
ZDJH050E
ZDJH051J
ZDJH010J


