


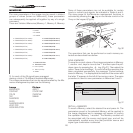

20
COLOR
This control (also called Saturation) increases or decreasethe
picture colour intensity. When set to zero, colour images will
be shown in black and white. Increasing the value, try to find
the point at which the colours look natural: suitable references
include skin tones and grass in landscape shots.
TINT
Controls the purity of the colours. Basically determines the
red-green ratio of the picture.
Reducing the value will boost the red contents of the picture,
increasing the value will boost the green tones. For this adjust-
ment use skin tones or a test pattern image with colour
bars as a reference.
SHARPNESS
Use this adjustment to increase and decrease the level of
picture detail.
When the sharpness value is reduced the image details ap
-
pear less pronounced, while increasing the value raises image
definition, making the outline of objects sharper.
Note that an excessively high value may result in a ‘noisy’ picture
and the edges of objects may be unnaturally defined.
SHARPNESS MODE
This allows you to select the type of processing associated with
sharpness adjustment. In the case of a progressive or interlaced
video signal Video mode is advisable; with PC graphic signals
use Graphic mode.
FILTER
This allows you to select the mode in which the input signal is
processed. Selecting the most appropriate value for a given
input signal ensures the best horizontal and vertical definition
and makes the picture sharper.
CINEMA MODE
In AUTO the deinterlacer recognises if the video signal source
is a movie film (obtained from a Telecine device with 3:2 or 2:2
pull-down) and applies a deinterlace algorithm optimised for
this type of signal.
If the video signal source is not identified as a film, or if you
select NO the deinterlacer applies a Motion compensated
algorithm optimised for video camera signals.
VIDEO TYPE
Activates a filter to improve stability of pictures from video
recorders or DVD players. To toggle between Normal, VCR1
mode and VCR2 mode press
on the remote control.
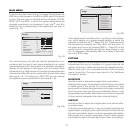
NOISE REDUCTION
This adjustments allows to choose the filter value for noise
reduction purposes.
As soon as this option is selected on the menu, the image is
divided in two parts.
In the left side the image is not altered by the filter, in the right
part the filter is activated.
This allows you to compare the effect of the filter.
It is possible to deactivated the filter
(NOT ACTIVE)
, to use the
automatic adjustments
(AUTO)
or to manually select (MANUAL)
the value suitable for the image with the VALUE adjustment.
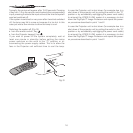
In case of using the VALUE adjustement, it is enoght to select
to cursor below and set the value with the
fl / ‡ keys of the
remote control.
Associated to the
NOISE REDUCTION
there is the possibility to
use the specific function
(FLESH TONE CORRECTION)
to make skin
tone more natural. Often the use of noise reduction filter slightly
degrades the image in those areas where skin tones are visible.
With the use of this function it is possible to maintain an excellent
image quality throughout the entire projected image.
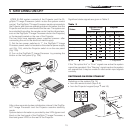
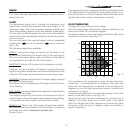
Table 4
Brightness
Contrast
Video
S-Video
RGBS
YCrCb
RGB Grafico
DVI-D
HDMI™
RGBS 15kHz
YCrCb 15kHz
Adjustments
Inputs
Colour
- -
-
-
-
-
-
- -
-
-
-
-
-
-
Tint
Sharpness
Sharpness Mode
Filter
Present only if the Video Standard is NTSC
Cinema Mode
Video Type
Noise reduction
Flesh tone correction
-
-
-
-
-
-
-
-
-
-
-
-
-