


27
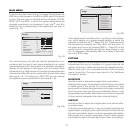
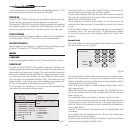
SAVE DEFAULT SETTINGS
To restore the original values to a previously modified Memory,
select the line corresponding to the Memory in question and
open the pull-down menu ( fl key). Then select the line ‘Initial
settings saved in Memory 1’. To confirm that the operation has
been completed successfully, the message ‘Memory 1 initia
-
lised’ is displayed at the bottom of the screen and the letter ‘I’
appears to the left of the name of the memory.
RENAME A MEMORY
It is possible to assign a name to each Memory. To assign a
name (with a maximum length of 12 alphanumeric characters)
to a Memory, select the option ‘Rename’ from the correspon
-
ding pull-down menu. Enter the text following the procedure
indicated in paragraph “source list”.
RESTORE CURRENT SETTINGS
On entering the ‘Memories’ menu, a copy of the current settings
is saved in a temporary menu (labelled with 0 - AUTO). Once
one or more memories have been recalled, you can restore the
settings that were effective at the moment the Memories menu
was accessed by selecting 0 - AUTO. However, this operation
must be completed before the ‘Memories’ menu page disap
-
pears (30 seconds after the last operation commanded from
the remote control or the keypad). The next time it appears,
the temporary memory will contain new information that takes
into account any Memories selected the penultimate time the
‘Memories’ page was accessed.
Memory 0 (- AUTO) can be used even when you do not wish
to enable the Memories management function for the signal
currently in use. Once Memory 0 has been selected, when a
source is chosen, the settings that were effective at the time
the Memory was previously recalled will be automatically
applied.
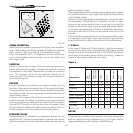
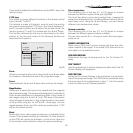
INFO
Displays the current status of the projector and information
concerning the projected video/graphic signal.
This function is displayed on pressing
on the remote control
(or, in the absence of the On Screen Display, the
‡ key on the
remote control).
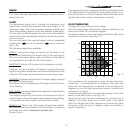
QUICK MENUS
The quick menus provide access to the main adjustments
that affect image quality, without calling the main On Screen
menus.
BRIGHTNESS, CONTRAST, COLOUR, TINT, SHARPNESS
and
FILTER
adju-
stments appear at the bottom of the screen one after the other
when the ·and ‚ keys are pressed.
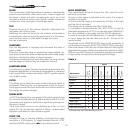
MESSAGES
The following messages may appear during operation of the
system:
No signal
The system does not recognise any signal applied to the se
-
lected input. In this case:
• Make sure the selected input is connected to a video or
graphic signal and that that source is functioning cor
-
rectly.
• Check the condition of the cables used to connect the sy
-
stem to the various sources.
• Make sure the video or graphic signals supplied by the sour-
ce are compatible with the system’s technical specifications
and, in particular, with those of the selected input.
Out of Range
This message appears when either the resolution or the ver
-
tical/horizontal frequency of the input signal exceeds system
specifications (e.g. a QXGA graphic signal) or when an input
is supplied with an incompatible signal (after setting the
components input to YCrCb 15kHz a progressive signal is
connected).