


21
Parking fanfold paper
It is not necessary to remove fanfold paper currently loaded in the printer in order to
print on cut-sheet paper. Instead, simply use the following procedure to park the
fanfold paper.
❏ Tear off the paper at a perforation so there is no more than half a page sticking
out of the front cover of the printer.
If necessary, you can press the control panel’s ON LINE button to put the printer
off-line. and then use the PAPER FEED button to feed the paper until a
perforation is just past the front cover.
❏ Press the control panel’s ON LINE button to put the printer off-line.
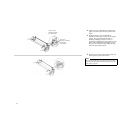
❏ While holding down the control panel’s FONT button, press the PAPER FEED
button. The printer automatically reverse feeds the fanfold paper until it is no
longer in contact with the platen, which is indicated by the printer beeping a
number of times. Also, the control panel’s POWER indicator starts to flash
because paper is not loaded.
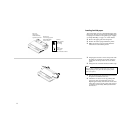
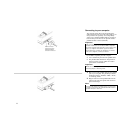
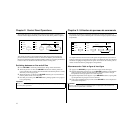
❏ Move the release lever to the cut-sheet position.
❏ Change the paper guide to its upright position.
You can now load cut-sheet paper into the printer using the procedures under
“Manual sheet feeding” on page 115.
Unparking fanfold paper
After you are finished printing on cut-sheet paper, use the following procedure to
unpark fanfold paper and make it available for printing.
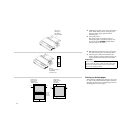
❏ Remove all cut-sheet paper from the printer.
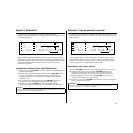
❏ Change the paper guide position so that it is laying down flat.
❏ Move the release lever to the fanfold position.
❏ Pull the bail lever toward the front of the printer to feed the paper to the starting
position.
❏ After the paper is fully fed (indicated by the printer’s beeping), return the bail
lever back to its original position toward the back of the printer.
The printer automatically goes back on-line at this time.
Mise en attente du papier continu
Il n’est pas nécessaire d’enlever le papier continu installé dans l’imprimante pour
imprimer sur des feuilles séparées. Effectuez simplement la procédure suivante pour
mettre le papier en attente.
❏ Déchirez le papier au niveau de la ligne prédécoupée en ne laissant pas dépasser
plus d’une demi-page du capot avant de l’imprimante. Si nécessaire, appuyez sur
la touche ON LINE du panneau de commande pour mettre l’imprimante hors
ligne, puis appuyez sur la touche PAPER FEED jusqu’à ce qu’une ligne
prédécoupée dépasse juste le capot avant.
❏ Appuyez sur la touche ON LINE du panneau de commande pour mettre
l’imprimante hors ligne.
❏ Tout en tenant enfoncée la touche FONT sur le panneau de commande, appuyez
sur la touche PAPER FEED. L’imprimante fait automatiquement défiler le
papier vers l’arrière jusqu’à ce qu’il ne soit plus en contact avec le cylindre. A ce
moment, l’imprimante émet un certain nombre de bips et le voyant POWER du
panneau de commande se met à clignoter car le papier n’est plus chargé.
❏ Réglez le levier de dégagement sur la position pour les feuilles séparées.
❏ Placez le guide-papier en position verticale.
Vous pouvez maintenant charger des feuilles séparées en effectuant les démarches de
“Alimentation manuelle feuille à feuille” à la page 116.
Remise en circulation du papier continu
Quand vous avez fini d’imprimer sur des feuilles séparées, effectuez les démarches
suivantes pour imprimer de nouveau sur le papier continu.
❏ Enlevez toutes les feuilles séparées de l’imprimante.
❏ Placez le guide-papier en position horizontale.
❏ Réglez le levier de dégagement sur la position pour le papier continu.
❏ Poussez le levier du presse-papier vers l’avant de l’imprimante pour mettre le
papier en position d’impression.
❏ Quand le papier est correctement engagé (indiqué par des bips sonores),
ramenez le levier du presse-papier sur sa position d’origine, vers l’arrière de
l’imprimante.