


Deployment
Trango Broadband Wireless — Access5830 User Manual Rev. F page 38
Press [space] then [enter] to stop
AP 11 -44 dBm
AP 11 -46 dBm
AP 11 -47 dBm
#>
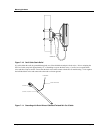
If it is not possible to receive an adequate RSSI reading, it may be necessary to reorient the AP (up/down, left/right),
increase the output power of the AP, or move the SU to a location with better line-of-sight conditions to the AP.
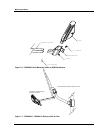
Once you are satisfied with the RSSI reading, tighten down the SU in the optimum position. To stop the RSSI continuous
readout, hit SPACE ENTER.
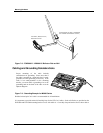
SU Alignment Using LEDs
The LED RSSI indicators on the bottom of the radio provide a handy alignment tool. If all four LEDs are lit (on FOX
Series Subscriber Units), the unit is receiving –60 dBm or stronger. If no LEDs are lit, there is not sufficient signal
strength to establish a wireless link.
Lit LEDs Signal Strength
0 LED -80 dBm
1 LED -75 dBm
2 LED -70 dBm
3 LED -65 dBm
4 LED -60 dBm
On an M5830 Series Subscriber Unit, the single amber light on the bottom of the SU will also indicate RSSI according to
the following parameters:
RSSI<
-80dBm not lit
RSSI > -80dBm blinking (blink rate increases with signal strength)
RSSI ≥ -65dBm solid
Link Management Commands
Once the radios are properly aligned for maximum RSSI, ensure the SU’s default Opmode is “SU” and that all
configuration parameters are correct.
Reboot the SU. Once the SU enters Opmode “SU,” the authentication process will begin and the two radios will begin to
associate. From the AP side there are several basic diagnostics commands, such as su ping, su status, and su testrflink,
to ensure that a reliable RF link has been established. It may take one minute or more for the association process to
complete. This process may take longer if there are many SUs in that sector.
If all tests show favorable results, the wireless link will automatically begin passing Ethernet traffic between the
radios.
In establishing and diagnosing the quality of the link between the AP and SU(s), there are a few commands that are
especially useful. All of these commands are performed at the AP. A summary of these commands follows:
su
Displays the status of all SUs in the AP’s SUDB. SUs in the SUDB will appear by SU ID, and will be classified into one
of the following status categories: Associated, Associating, and OFF.
su live
Displays a list of SUs that are currently associating with the AP (by SU ID).
Example: