


Scanning to USB Memory Device
Xerox WorkCentre 3315DN/3325DN/3325DNI
User Guide
127
Scanning to USB Memory Device
You can scan a document and save the scanned image onto a USB memory device. When the USB
Memory Device is inserted into the USB memory port, the option to Scan To USB is automatically
displayed. If this option is selected, the machine immediately scans your documents using the default
scan settings. If different scan settings are required for your job, change the settings prior to inserting
the USB Memory Device. Refer to Select the Features on page 50 for information about changing the
scan settings.
Note: Some options may be unavailable depending on your machine configuration.
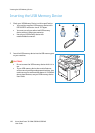
1. Load the documents to be scanned either face down on the document glass or face up into the
automatic document feeder.
2. Insert a USB Memory Device into the USB memory port on your machine. The USB menu
automatically displays.
Note: When in Power Save mode, the machine will not recognize when a USB Memory Device is
inserted into the USB port. Press any button to restore the machine to a normal state and reinsert
the USB Memory Device into the port.
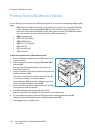
3. Press the up/down arrows to highlight Scan to USB and press OK.
4. Your machine begins scanning the original, and then asks if you want to scan another page.
To scan another page, press the left/right arrows to highlight Yes and press OK. Load an original
and press Start.
Otherwise, press the left/right arrows to highlight No and press OK.
After scanning is complete, you can remove the USB memory device from the machine.