


ZebraNet® Utilities
ZebraNet Alert
PrintServer II User and Reference Guide 121
• If no DHCP server is present, you might need to assign the printer an IP
address.
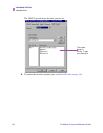
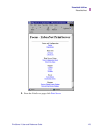
3. To assign your printer an IP address, from the menu bar, select
Print
Server>Configuration
.
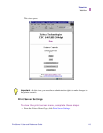
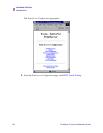
4. For PrintServer SNMP Traps, select the SNMP Traps tab.
5. Enter the trap destination and options.
This tells the PSII what TCP/IP address to send the alerts to, and under what
circumstances to send error and log reports. Entering 255.255.255.255 broadcasts
the message to every host on the network with a SNMP program running.
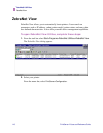
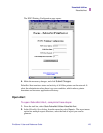
6. For ZebraNet Alert to go get and display the messages, you need to open ZebraNet
Alert. To do this, follow these steps:
• From the task bar, select Start>Programs>ZebraNet Utilities>ZebraNet Alert.
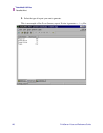
• In the ZebraNet Alert dialog, from menu bar, select View>Filter Settings.
• From the View Filter - Devices tab, choose your settings accordingly.
• The View Filter - Events tab, allows you to select individual events you want the
program to be aware of.
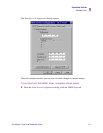
Sending Email to Your Zebra Printer
To easily transfer instructions and data to your printer from a remote location, PSII
allows you to send email to the printer. This is set up under the link POP3 email
Printing. You need to provide the address of the network POP3 server, a user name,
and a password.
Important • The SNMP trap settings must be established to communicate with PSII
if messages are sent to the ZebraNet Alert
Note • If you select No device filtering messages from every printer are caught;
Device Address allows you to specify which IP address data will come from.
Important • Now PSII’s SNMP Alert messages can be set up in WebView. From
the printer’s home page, activate the link to Alert Setup. You can add messages that
are sent to the ZebraNet Alert for Windows by choosing SNMP as a destination.