


Prestige 2602HW Series User’s Guide
260 Chapter 26 Remote Node Configuration
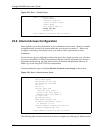
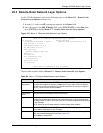
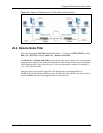
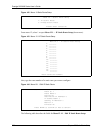
26.3.1 My WAN Addr Sample IP Addresses
The following figure uses sample IP addresses to help you understand the field of My WAN
Addr in menu 11.3. Refer to the previous Figure 19 in the web configurator chapter on LAN
setup for a brief review of what a WAN IP is. My WAN Addr indicates the local Prestige
WAN IP (172.16.0.1 in the following figure) while Rem IP Addr indicates the peer WAN IP
(172.16.0.2 in the following figure).
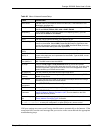
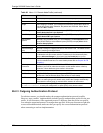
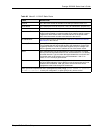
Address
Mapping Set
When Full Feature is selected in the NAT field, configure address mapping sets in
menu 15.1. Select one of the NAT server sets (2-10) in menu 15.2 (see Chapter 29
Network Address Translation (NAT) for details) and type that number here.
When SUA Only is selected in the NAT field, the SMT uses NAT server set 1 in menu
15.2 (see Chapter 29 Network Address Translation (NAT) for details).
Metric The metric represents the cost of transmission for routing purposes. IP routing uses
hop count as the cost measurement, with a minimum of 1 for directly connected
networks. Type a number that approximates the cost for this link. The number need
not be precise, but it must be between 1 and 15. In practice, 2 or 3 is usually a good
number.
Private This determines if the Prestige will include the route to this remote node in its RIP
broadcasts. If set to Yes, this route is kept private and not included in RIP broadcast.
If No, the route to this remote node will be propagated to other hosts through RIP
broadcasts.
RIP Direction Press [SPACE BAR] and then [ENTER] to select the RIP Direction. Options are
Both, In Only, Out Only or None.
Version Press [SPACE BAR] and then [ENTER] to select the RIP version. Options are RIP-1,
RIP-2B or RIP-2M.
Multicast IGMP-v1 sets IGMP to version 1, IGMP-v2 sets IGMP to version 2 and None disables
IGMP.
IP Policies You can apply up to four IP Policy sets (from 12) by typing in their numbers separated
by commas. Configure the filter sets in menu 25 first (see Chapter 38 IP Policy
Routing ) and then apply them here.
When you have completed this menu, press [ENTER] at the prompt “Press ENTER to Confirm
or ESC to Cancel:” to save your configuration, or press [ESC] at any time to cancel.
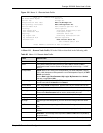
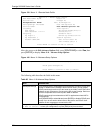
Table 84 Menu 11.3 Remote Node Network Layer Options (continued)
FIELD DESCRIPTION