


Prestige 2602HW Series User’s Guide
344 Chapter 36 System Maintenance
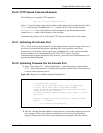
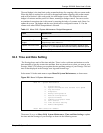
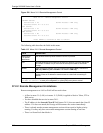
Figure 229 Menu 24.10 System Maintenance: Time and Date Setting
36.3.1 Resetting the Time
• The Prestige resets the time in three instances:
• On leaving menu 24.10 after making changes.
• When the Prestige starts up, if there is a timeserver configured in menu 24.10.
Menu 24.10 - System Maintenance - Time and Date Setting
Use Time Server when Bootup= None
Time Server Address= N/A
Current Time: 00 : 51 : 24
New Time (hh:mm:ss): 00 : 51 : 19
Current Date: 2000 - 01 - 01
New Date (yyyy-mm-dd): 2000 - 01 - 01
Time Zone= GMT
Daylight Saving= No
Start Date (mm-dd): 01 - 00
End Date (mm-dd): 01 - 00
Press ENTER to Confirm or ESC to Cancel:
Table 112 Menu 24.10 System Maintenance: Time and Date Setting
FIELD DESCRIPTION
Use Time Server
when Bootup
Enter the time service protocol that your time server sends when you turn on
the Prestige. Not all time servers support all protocols, so you may have to
check with your ISP/network administrator or use trial and error to find a
protocol that works. The main differences between them are the format.
Daytime (RFC 867) format is day/month/year/time zone of the server.
Time (RFC-868) format displays a 4-byte integer giving the total number of
seconds since 1970/1/1 at 0:0:0.
NTP (RFC-1305) is similar to Time (RFC-868).
None. The default, enter the time manually.
Time Server Address Enter the IP address or domain name of your time server. Check with your ISP/
network administrator if you are unsure of this information.
Current Time This field displays an updated time only when you reenter this menu.
New Time Enter the new time in hour, minute and second format.
Current Date This field displays an updated date only when you re-enter this menu.
New Date Enter the new date in year, month and day format.
Time Zone Press [SPACE BAR] and then [ENTER] to set the time difference between your
time zone and Greenwich Mean Time (GMT).
Daylight Saving If you use daylight savings time, then choose Yes.
Start Date If using daylight savings time, enter the month and day that it starts on.
End Date If using daylight savings time, enter the month and day that it ends on
When you have completed this menu, press [ENTER] at the prompt “Press ENTER to Confirm
or ESC to Cancel:
” to save your configuration, or press [ESC] at any time to cancel.