


Prestige 2602HW Series User’s Guide
270 Chapter 28 Bridging Setup
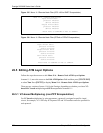
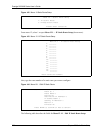
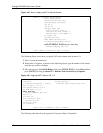
Figure 145 Menu 11.1 Remote Node Profile
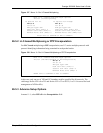
3 Move the cursor to the Edit IP/Bridge field, then press [SPACE BAR] to set the value to
Yes and press [ENTER] to edit Menu 11.3 – Remote Node Network Layer Options.
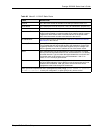
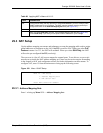
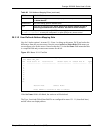
Figure 146 Menu 11.3 Remote Node Network Layer Options
Menu 11.1 - Remote Node Profile
Rem Node Name= ? Route= IP
Active= Yes Bridge= Yes
Encapsulation= ENET ENCAP Edit IP/Bridge= No
Multiplexing= VC-based Edit ATM Options= No
Service Name= N/A Edit Advance Options= N/A
Incoming: Telco Option:
Rem Login= N/A Allocated Budget(min)= N/A
Rem Password= N/A Period(hr)= N/A
Outgoing: Schedule Sets= N/A
My Login= N/A Nailed-Up Connection= N/A
My Password= N/A Session Options:
Authen= N/A Edit Filter Sets= No
Idle Timeout(sec)= N/A
Press ENTER to Confirm or ESC to Cancel:
Menu 11.3 - Remote Node Network Layer Options
IP Options: Bridge Options:
IP Address Assignment= Static Ethernet Addr Timeout (min)= 0
Rem IP Addr: 0.0.0.0
Rem Subnet Mask= 0.0.0.0
My WAN Addr= 0.0.0.0
NAT= Full Feature
Address Mapping Set=2
Metric= 2
Private= No
RIP Direction= Both
Version= RIP-2B
Multicast= IGMP-v2
IP Policies=
Press ENTER to Confirm or ESC to Cancel:
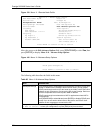
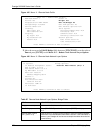
Table 87 Remote Node Network Layer Options: Bridge Fields
FIELD DESCRIPTION
Bridge (menu 11.1) Make sure this field is set to Yes.
Edit IP/Bridge (menu 11.1) Press [SPACE BAR] to select Yes and press [ENTER] to display menu
11.3.
Ethernet Addr Timeout
(min.) (menu 11.3)
Type the time (in minutes) for the Prestige to retain the Ethernet Address
information in its internal tables while the line is down. If this information is
retained, your Prestige will not have to recompile the tables when the line
comes back up.