


Changing Device Configuration 45
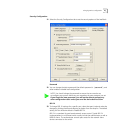
• The Link Up Trap signals when then SNMP agent has gone to the “up” state
and is now reachable.
• An Auth Fail Trap indicates a wrong Community name in the SNMP
transmission.
• Vendor Specific Traps indicate 802.1X User Login, 802.1X User Logout, and
802.1X Login Failure when the IntelliJack is configured for 802.1X.
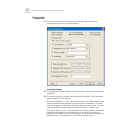
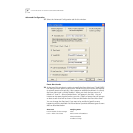
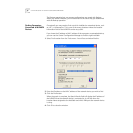
33 You can Set Trap Destination by entering the IP address of your SNMP
management console. This eliminates the need to build a Trap Destination Table
via a Management Information Database (MIB) browser.
34 Set the Trap Community String in the appropriate field of this window.
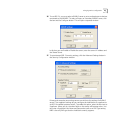
35 The “Get” Community String allows an SNMP Management Tool to read from an
IntelliJack configured for SNMPv1. In order to do so, you must configure this string
to be the same on both the SNMP Management Tool and the IntelliJack.
Similarly, the “Put” command allows a SNMP Management Tool to write to the
IntelliJack using SNMPv1. To do so, you must configure the IntelliJack “Put”
Community String to correspond with the one on the SNMP Management Tool”.
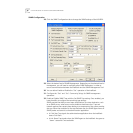
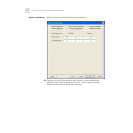
36 In order for an SNMP Management Tool to communicate with an NJ240FX in
SNMPv3 mode, you will first need to create an SNMPv3 Profile on the NJ240FX.
Please note that, as with passwords, these stored profiles will not be displayed, so
it is advised that you make note of the details of your saved profiles. You can store
up to 14 SNMPv3 User Profiles on your NJ240FX, and you can add, modify or
delete a profile.
To create a profile, enter the desired User Name, with the appropriate
Authentication and Privacy Protocol, and passwords if required. These protocols
and passwords are not required, but must match the corresponding settings on
the SNMP Management Tool you wish to use for communication with the
IntelliJack. Once you have selected the appropriate options for the profile, you can
either save it as a new profile by selecting Apply. You can also modify the settings
of a profile previously stored with the specified User name, by selecting the Edit
operation, and then selecting Apply.
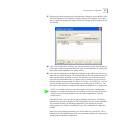
You can use the Delete option to create space in the database, by deleting
previously stored profiles. To do this, you enter the name of the profile and select
Delete Operation, followed by Apply. To delete a profile, you only need to enter
the profile name, you do not need to enter any other parameters.