


30
ON-SCREEN FLAGS
You have several options for programming your Exception Report. The first option typically has all programmed
exceptions display a flashing asterisk in the upper right corner of the on-screen display, or reversing the entire text
display. This on-screen flag is controlled through the ALARM OUTPUTS menu. You assign a corresponding alarm to
an exception and set the parameters for the flag in this menu. You do this by choosing “DISPLAY” for the corresponding
exception number and selecting “ON”. With this option, all questionable transactions (exceptions) will be “flagged”
with the flashing asterisk.
You can then review these exceptions by putting your DVR or VCR in play and pressing the FF button. This will give
you a fast scan of the tape and you can go into normal play when you see the flashing asterisk and view that
transaction in real time or slow play or frame by frame, depending on the type of playback options of your particular
DVR or VCR.
HARD ALARM OUTPUT
The VSI-Pro allows you to program exceptions to trigger external alarming devices such as time-lapse VCR’s,
quads, enunciators, LED’s etc. Using the ALARM OUTPUT you can have your time-lapse VCR record only exceptions,
or have an alarming quad go to full screen on an exception, or even trigger a buzzer to alert you that an exception
has occurred.
PRINTER or DVR OUTPUT
There may be situations where you do not want cashiers or other employees to know what triggers an exception. In
this case, the VSI-Pro provides a separate output that will send data to a remotely located serial printer. If you turn the
on-screen display off and the output on and you have a remote serial printer hooked up to the VSI-Pro, then, whenever
an exception is reported, it is sent out to the serial printer only. The printer will give you a hard copy printout of the
questionable transaction with the time and date. With this hard copy printout of the exception report, you can then
review the tape by going directly to that exception’s time.
The serial printer output of the VSI-Pro can be programmed to send out the entire transction. The output can be
connected to the other equipment such as DVRs, computers, phone line transmissions or digital storage devices for
later retrieval.
The VSI-Pro also has a “triggered text” feature. This feature allows programmed text or control characters to be sent
out when an exception occurs to trigger devices like DVR’s to save the data file for future review. Other computer
devices can wait for this specified text string and do other functions at this time via the serial communication process.
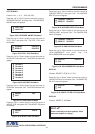
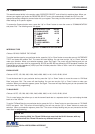
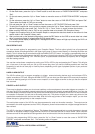
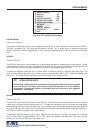
From the main programming VSI-Pro menu, press the “Up” or “Down” button to move the cursor to “EXCEPTION
REPORT” and press and release “Set”. The following menu will appear:
VSI-Pro VIDEO SERIAL INTERFACE
The following is a brief overview of how to set up Exception Reports.
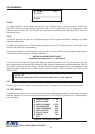
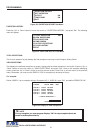
1. On the main-menu, press the “Up” or “Down” button to move the cursor to “EXCEPTION REPORT” and press
“Set”.
2. On the sub-menu, press the “Up” or “Down” button to move the cursor to “EXCEPTION HISTORY” and press
“Set”.
3. On the sub-menu, press the “Up” or “Down” button to move the cursor to “DVR SELECTION” and press “Set”.
Thenn select the model of DVR you are using.
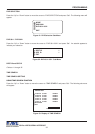
4. Exit and press the “Up” or “Down” button to move the cursor to “SET EXCEPTION” and press “Set”.
5. To select the Exception No. that you wish to program, press the “Up” or “Down” button to move the cursor to the
desired Exception No. then press “Set”.
Press the “Up” or “Down” button to toggle between the choices.
6. Make sure that DISPLAY is set to “ON” for any exception data to be saved in the Exception History.
7. Program the Exception String in the Exception Report to compare the data that shows on the screen for time
search mode in the Exception History menu.
8. After you have set up the desired configurations, press the REC button on the DVR to record video into a hard
drive or use alarm output for triggering the DVR at record input.
9. The monitor should display a flashing REC message and the REC button will light up indicating the DVR is in
the recording mode.
PROGRAMMING