


39
VSI-Pro VIDEO SERIAL INTERFACE
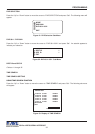
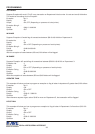
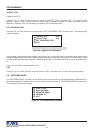
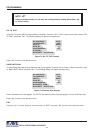
Figure 66: ALARM OUTPUTS Sub-Menu
5.8 ALARM OUTPUTS
To access alarm output, press the “Up” or “Down” button to move the cursor to “ALARM OUTPUTS” and press “Set”.
The following sub-menu will appear:
The ALARM OUTPUTS menu controls not only the formatting of the external alarms but
also the formatting of the on-screen flags assigned to individual exceptions.
ALARM NO.
Choices: 1, 2, 3, 4, 5, 6, 7, 8, 9, 10, 11, 12, 13, 14, 15, 16, 17, 18, 19, 20, 21, 22, 23, 24
The VSI-Pro allows you up to 16 alarms that may be used with any of the user programmed exceptions. However
there are only 2 hardwired alarm outputs and these correspond to Alarm 1 & 2 only. The other 14 alarms can be used
to send trigger text, serial data out or flash the screen. To select the Alarm Number that you want to program, press
the “Up” or “Down” button to move the cursor to “ALARM NO.” and press “Set”. The cursor will start flashing. Press
the “Up” or “Down” button to cycle through the values and press “Set” when the desired value is displayed.
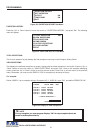
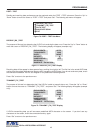
PROGRAMMING
EXCEPTION REPORT MENU CONTINUED
OUTPUT
Choices: ON, OFF
This is global output to send data to the serial printer. When “ON” is selected all the data will be send to the serial printer
regardless of what setting of out put has selected in the individual output in set exception menu. When “OFF” is selected
only those exception will send to the serial printer whose out put is “ON” under set exceptions menu for individual
exceptions. To turn output “ON” or “OFF”,
press the “Up” or “Down” button to move the cursor to “OUTPUT” and press
“Set”.
Press the “Up” or “Down” button to cycle through the values and press “Set” when the desired value is displayed.
TIME STAMP
Choices: ON, OFF
If TIME STAMP is selected “ON” then printer will print the exception with time stamp flag, otherwise just print the Exception.
To turn TIME STAMP “ON” or “OFF”,
press the “Up” or “Down” button to move the cursor to “TIME STAMP” and press
“Set”.
Press the “Up” or “Down” button to cycle through the values and press “Set” when the desired value is displayed.
EXIT
P
ress the “Up” or “Down” button to move the cursor to “Set” to return to the previous menu.
ALARM NO. 1
ALARM TRIGGER 1
NORMALSTATE NO
ALARM DURATION 20
FLAG TYPE FLASH *
FLAG DURATION 000
TRIGGERED TEXT
EXIT