


User Manual version 2305
APOLLO 120/150 III
2-17
2.2. System Setup for the First-time Use
To set up the APOLLO 120/150 for the first-time use, you
should have the following items ready. The items are either
in the accessory box or available in any computer stores.
u 110V or 220V power cord
u PS/2 or AT keyboard or wireless keyboard
u PS/2 or serial mouse
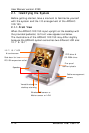
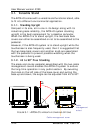
2.2.1. Installation Procedures
The APOLLO system can be powered either by an AC
electrical outlet (100~240V/5A @60Hz, 200~240V/2.5A @50Hz)
or by DC power source (20~28VDC or 40~56VDC or 36~72VDC).
If the system is to be powered up by AC power, be sure to use
the right power cord (110V or 220V) for connection.
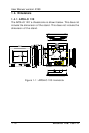
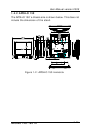
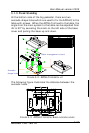
1. Connect the female end of the power cord to the AC inlet
located at the rear bottom side of the panel PC.
2. Connect the 3-pin male end of the power cord to an
electrical outlet.
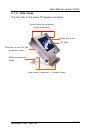
3. Connect a PS/2 keyboard or an AT keyboard to keyboard
port. If you are using an AT keyboard, you need an
adapter (AT to PS/2 KB) for this connection.
4. Connect the PS/2 mouse to the PS/2 mouse port. If you
are using a serial mouse, it can be connected to the COM
port.
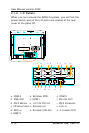
5. Turn on the main switch on the power supply if there is
one.
6. Power on the panel PC by switching the power switch
located at the rear bottom side.