


Chapter 2 Upgrading Mac OS X Server Version 10.3 17
Step 1: Update your server to version 10.3.9
Use Software Update, if necessary, to update your server to version 10.3.9.
Step 2: Perform an upgrade installation to version 10.4
You can use the version 10.4 installation disc to perform the upgrade installation locally
on your server computer if it has a display, keyboard, and optical drive attached.
After the upgrade installation is complete, the computer restarts and Server Assistant
leads you through initial server setup. Your existing settings are displayed, and you can
change them if you like.
To upgrade to version 10.4 and perform initial server setup locally:
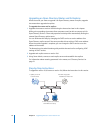
1 Make sure that any DHCP or DNS servers your server depends on are running.
2 Turn on the computer and insert the installation disc into the optical drive.
3 Restart the computer while holding down the C key on the keyboard. The computer
boots from the installation disc. You can release the C key when you see the Apple
logo.
4 When the Installer opens, proceed through its panes by following the onscreen
instructions. In the Select a Destination pane, be sure to select the disk or partition on
which version 10.3.9 is installed. Click Options, and select “Don’t erase.” Click OK.
5 During installation, progress information is displayed.
If you’re using installation CDs (not available for version 10.4.7 or later), insert the next
installation disc when prompted.
6 After installation is complete, the computer restarts automatically and Server Assistant
opens so you can perform initial server setup.
Move through the Assistant’s panes, following the onscreen instructions. Your existing
settings are displayed in the panes, but you can change them if you like.
Unless you have a site license, you’ll need to enter a unique server software serial
number for each server you upgrade. You’ll find the number printed on the materials
provided with the server software package. If you have a site license, a registered
owner name and organization must be entered exactly as specified by your Apple
representative.
When you use the Directory Usage pane, it’s best to select “No change” in the server’s
directory setup. After setup is complete, you can make adjustments if necessary,
following instructions in the Open Directory administration guide.
You can’t enable or disable mail service or WebDAV service in the Services pane.
If either service is running when you upgrade, it will be running afterwards. If either
service is stopped when you upgrade, it will be stopped afterwards.
To enable or disable mail service or WebDAV service, use Server Admin after initial
server setup is complete.