


Section 4: Setting Up - Windows
AXIS 540/640 User’s Manual 55
Install the TCP/IP
Protocol Stack
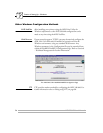
In the Control Panel, click the Network icon. If the TCP/IP Printing
entry appears, then TCP/IP is already installed. Close the Network
folder and skip to Installing a Printer below.
Follow these steps to install the TCP/IP protocol stack:
1. In the Control Panel, select Network.
2. Click Add Software..., select “TCP/IP Protocol and related
components” and click Continue.
3. Check the “TCP/IP Network Printing Support” and click
Continue.
4. Select path and then click Continue.
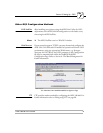
5. Click OK in the Network Settings dialog box.
Installing a Printer Proceed as follows to install a printer for LPD printing.
1. In the Control Panel, click the Print Manager.
2. In the Printer menu, select Create Printer.
3. In the Printer Name field, type a name for your printer.
4. Choose a printer driver suitable for your printer.
5. In the Print to field, select Other...
6. In the Print Destinations dialog, choose LPR Port, then click OK.
The Add LPR Compatible Printer dialog now appears.
7. In the Name or Address field, type the IP address or the alias
name of your AXIS 540/640.
Note: If you use an alias name, this must be defined in the hosts
file on your server prior to the installation. This file is normally
located in /winnt35/system32/drivers/etc/hosts.
8. In the Name of Printer on the Machine field, type the logical
printer number you want to use, e.g. pr1. Click OK.
9. Click OK to complete the installation.